
Mini Tiramisu Cheesecake Recipe
Introduction
There’s something about the first spoonful of a mini tiramisu cheesecake that stops you in your tracks: the warm, bittersweet perfume of coffee, the cool, velvety lift of cream cheese, and the dark, silky whisper of chocolate ganache on top. Each bite is an orchestra of textures — a crisp, buttery biscuit base, a dreamy, mousse-like coffee cheesecake layer, a coffee-dipped ladyfinger surprise, and a glossy ganache truffle that melts and coats the tongue. It’s comfort and celebration rolled into a single elegant bite.
This recipe is perfect for winter dinner parties, cozy weekend mornings when you want a decadent treat with your coffee, or as a showstopping addition to holiday dessert tables. It’s also an ideal make-ahead dessert: assemble and freeze overnight, then bring out to thaw for a relaxed afternoon gathering. If you love small, crowd-pleasing desserts, you might also appreciate the technique behind other compact cheesecakes; take a look at this helpful guide to a traditional Polish cheesecake for inspiration: Polish cheesecake technique and tips.
Dish Snapshot
- Prep Time: 35 minutes (active)
- Cook Time: 15 minutes active (ganache) + chilling/freezing time
- Total Time: ~6 hours 50 minutes (includes minimum 6 hours freeze)
- Servings: 8 mini cheesecakes (using an 8-cavity mould or cupcake tray)
- Difficulty Level: Intermediate — no oven needed, but requires attention to temperatures when working with gelatine and ganache
Nutrition Highlights
Estimated nutrition per serving (1 of 8). These values are calculated using standard food composition data from USDA FoodData Central and represent an approximate estimate for planning purposes.
- Calories: ~1,090 kcal
- Protein: ~12 g
- Carbohydrates: ~66 g
- Sugars: ~38 g
- Dietary Fiber: ~2–3 g
- Total Fat: ~87 g
- Saturated Fat: high (from cream, cream cheese, butter, chocolate)
- Sodium: ~300–400 mg
Note: This is a rich, indulgent dessert intended for occasional enjoyment. For authoritative dietary guidance on saturated fat and safe refrigeration times for dairy desserts, consult sources such as USDA Food Safety and the CDC.
Why You’ll Love It
- Flavor & Texture Highlights: The layered flavor profile — real coffee in the filling and dipped ladyfingers, the lightly sweetened tang of cream cheese, and the bittersweet ganache — makes every bite complex yet balanced. The contrast between the crunchy cocoa-speckled biscuit base and the airy cheesecake filling keeps the mouthfeel interesting.
- Make-Ahead Ease: Most of the hands-on work happens up front; then the cheesecakes freeze or chill while you relax or prepare other dishes. This makes them especially suited for hosting.
- Nostalgia & Sociability: Tiramisu evokes café memories and shared evenings; making it in mini, handheld portions makes it perfect for gatherings where guests mill and taste.
- Seasonal Appeal: Rich enough for winter holidays, but elegant and small enough to feel celebratory at showers or summer soirées.
How to Make Mini Tiramisu Cheesecake Recipe
Ingredients
- 260 g cookies (mix plain and chocolate)
- 120 g butter (unsalted, melted)
- ⅓ cup water (hot from the kettle)
- 4 tsp gelatine (powder)
- 500 g cream cheese (softened)
- ¾ cup powdered sugar
- ½ cup coffee (warm)
- 1 tsp vanilla extract
- 450 ml heavy cream
- 12 ladyfingers (sponge finger biscuits)
- 1½ cups coffee (cold)
- 300 g dark chocolate (chopped)
- 200 g heavy cream
- ½ tbsp cocoa powder (for dusting)
- 6 wafer rolls (picollo)
Optional ingredients & substitutions
- Lighter option: Use reduced-fat cream cheese and lower-fat whipping cream, but texture will be slightly less rich.
- Gelatine substitute: Use vegetarian gelatine alternatives (check manufacturer instructions for bloom and quantity).
- Gluten-free: Use gluten-free sandwich cookies and gluten-free ladyfingers.
- Flavor swap: Replace ½ cup warm coffee with ½ cup strongly brewed espresso for a bolder coffee flavor; add 1 tbsp coffee liqueur for an adult version.
Step-by-step instructions
-
Make the Biscuit Base
- Place cookies in a zip-top bag and crush to fine crumbs using a rolling pin (or pulse in a stick blender). The mix of plain and chocolate cookies gives a speckled look to the base.
- Combine the crumbs with melted butter until the texture resembles wet sand.
- Press the mixture firmly into the bottoms of an 8-cavity silicone mould or a cupcake tray lined with baking cups. Press evenly for firm bases.
- Chill in the refrigerator while you prepare the cheesecake layer. Chilling helps the base set and hold shape when adding filling.
-
Prepare the Coffee Cheesecake Filling
- Dissolve gelatine powder in ⅓ cup hot water. Stir until fully dissolved and set aside to cool slightly but not set.
- In a large bowl, beat softened cream cheese with powdered sugar until completely smooth and free of lumps. Use a hand mixer on medium speed for best results.
- Add ½ cup warm coffee and 1 tsp vanilla extract to the cream cheese mixture and beat until combined.
- Pour in 450 ml whipping cream and beat on medium-high until the mixture thickens and is smooth but still pourable (soft peaks).
- With the mixer running on low, slowly add the warm gelatine to the cream cheese mixture in a thin stream to ensure even incorporation and avoid clumping.
- Spoon about half of the cheesecake mixture over the chilled biscuit bases in each cavity, smoothing gently.
- Halve the ladyfingers and quickly dip each half into the 1½ cups cold coffee (do not soak — a quick dip is enough). Place one dipped half into each cheesecake on top of the first layer.
- Top each with the remaining cheesecake mixture and smooth the tops.
- Freeze for a minimum of 6 hours or overnight. Freezing keeps the minis firm and makes them easy to unmould.
-
Make the Ganache Truffle Balls
- Heat 200 g heavy cream in a small saucepan until small bubbles form at the edges and it’s just starting to boil.
- Pour the hot cream over 300 g chopped dark chocolate in a heatproof bowl. Let sit for 1 minute, then stir gently until smooth and glossy.
- Cover and refrigerate the ganache until firm (a few hours or overnight).
- Once firm, scoop the ganache into small balls using a melon baller and place on a tray lined with parchment. Keep chilled until assembly.
-
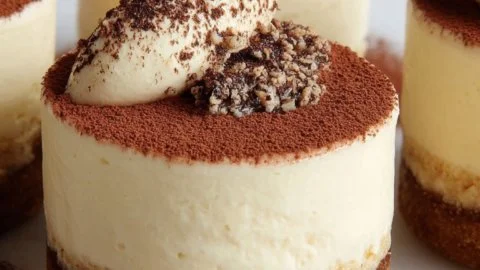
Garnish and Serve
- When ready to serve, gently remove the mini cheesecakes from the moulds and place them on a serving plate.
- Place one ganache ball on top of each mini cheesecake.
- Dust each mini cheesecake with ½ tbsp cocoa powder through a fine sieve and add a wafer roll for crunch and presentation.
- For best texture, refrigerate the assembled minis for at least 2 hours to partially thaw before serving so they’re creamy but still hold shape.
Practical tips
- Avoid overbeating the cream cheese to prevent graininess. Beat until just smooth.
- Add gelatine gradually and at the right temperature — warm enough to remain liquid but not hot enough to cook the cream mixture.
- When dipping ladyfingers, quick dips prevent them from becoming soggy and falling apart.
- If you prefer a softer set (not frozen), chill for 4–6 hours instead of freezing.
Serve It Up
Best Pairings
- Classic: Serve with a small espresso or strong black coffee to mirror the tiramisu flavors.
- Wine pairing: A tawny port or a sweet Marsala complements the chocolate and coffee notes.
- Light accompaniment: Fresh berries (raspberries or strawberries) or a citrusy salad to cut the richness.
- Presentation tip: Plate two minis with a dusting of cocoa, a small drizzle of chocolate sauce, and a mint sprig for a restaurant-style finish.
You can also link to another small dessert for party variety — for a chocolate-and-cream pairing that’s just as elegant, try this mini Black Forest cakes guide: mini Black Forest cakes recipe.
Storing Leftovers
- Room Temperature: Do not leave these cheesecakes at room temperature for more than 2 hours (USDA food safety guidance for perishable dairy items).
- Refrigeration: Store in an airtight container for up to 3–4 days. Keep ganache-covered surfaces from sticking by placing parchment between layers.
- Freezer: Freeze tightly wrapped or in an airtight container for up to 2 months. Thaw in the refrigerator for several hours or overnight before serving; then allow 2 hours at fridge temp to reach a scoopable, creamy texture.
Pro Tips & Tricks
- Best Ingredients: Use full-fat cream cheese and high-quality dark chocolate (60–70% cacao) for the most satisfying texture and flavor.
- Texture keys: The cream should be whipped to soft peaks — too stiff and the filling will be dense; under-whipped and it won’t set properly.
- Gelatine check: If you’re using powdered gelatine, bloom it in cold water first (if directed by the brand) and then dissolve in hot water; always follow the gelatine package for best results.
- Ganache consistency: If your ganache is too soft to roll into truffles, chill it until firm but still pliable—about 30–60 minutes in the fridge.
- Quick unmoulding: If minis are stubborn, briefly warm the outside of the silicone mould with your hands or dip the base in warm water for a few seconds (avoid getting water on the cheesecake).
Creative Twists
- Vegan Tiramisu Minis: Replace cream cheese with a blended mixture of silken tofu and soaked cashews (use a high-powered blender), swap heavy cream for coconut cream whipped with a stabilizer (e.g., a small amount of agar-agar prepared per package directions), and use dairy-free dark chocolate. Use a vegan cookie base and oat-based ladyfingers.
- Gluten-free Version: Use certified gluten-free sandwich cookies and gluten-free ladyfingers or sponge cake. Ensure all other ingredients (like chocolate) are certified gluten-free.
- Orange-Espresso Tiramisu: Add 1 tbsp finely grated orange zest to the cream cheese mixture and swap half the coffee with fresh orange liqueur for a bright, adult twist.
- Lighter Assembly: Make smaller bite-sized portions by halving the recipe and using mini candy molds; reduce sugar by 20% and use a lower-fat cream to lighten the calorie load (texture will be slightly less rich).
Frequently Asked Questions
Q: Can I skip the gelatine?
A: You can omit gelatine, but the filling will be looser and require longer chilling to firm up. Consider using a stabilizer like mascarpone (for richness) or a vegetarian gelling agent following manufacturer instructions.
Q: How do I prevent the ladyfingers from getting soggy?
A: Dip the ladyfingers quickly in cold coffee; a brief dunk (1–2 seconds) prevents oversaturation. Place them immediately into the cheesecake layer to avoid sogginess.
Q: Can these be made ahead?
A: Yes — they’re ideal for making a day or two ahead. Freeze or refrigerate and allow 2 hours to thaw in the refrigerator before serving.
Q: Are there healthier swaps that preserve texture?
A: Use lower-fat cream cheese and replace some heavy cream with Greek yogurt (strain to thicken). Note: flavor and silkiness will be reduced.
Q: How to reheat or revive frozen ganache texture?
A: Let ganache-truffle-topped minis warm in the refrigerator for several hours. If ganache becomes overly firm, briefly press a warm spoon to the surface to soften before serving.
Conclusion
If you want a dessert that looks sophisticated but is truly approachable, these mini tiramisu cheesecakes are a winner — rich coffee flavor, silky texture, and a dramatic chocolate finish in every bite. They’re excellent for prepping ahead and make a memorable centerpiece for gatherings. For a slightly different presentation and technique ideas, check this lovely take on mini tiramisu cheesecakes from Brown Eyed Baker: Mini Tiramisu Cheesecakes – Brown Eyed Baker. If you’d like to compare another home baker’s step-by-step and variations, this #Baketogether version also offers great tips: #Baketogether Mini Tiramisu Cheesecakes – Abby Dodge.
I’d love to see how your minis turn out — share your photos and tweaks in the comments below and join the conversation with other bakers!
Printable Recipe Card
Want just the essential recipe details without scrolling through the article? Get our printable recipe card with just the ingredients and instructions.


