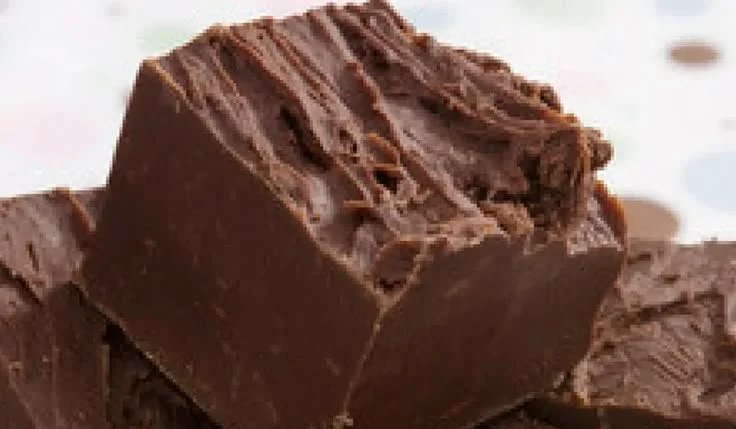
Dairy Free Chocolate Fudge
There’s something almost magical about a slab of chocolate fudge that’s silky, just-set, and gives way to a small, satisfying crack as you bite into it. Imagine a warm, cocoa-forward aroma filling the kitchen, a glossy surface catching the light, and a first taste that is dense, intensely chocolatey, and melting on your tongue. This dairy free chocolate fudge uses rich dairy-free chips and sweetened condensed coconut milk to give you that classic, nostalgic fudge experience — without dairy. It’s comforting, indulgent, and easy enough to make on a weeknight, yet elegant enough to bring to holiday gatherings or to gift in pretty boxes.
This recipe is perfect when you want an accessible, crowd-pleasing treat that suits dairy-free or vegan-ish diets (check labels for fully vegan chips). Make it for cozy afternoons with coffee, festive cookie plates, potlucks, or as a simple homemade gift. It’s fast to assemble, requires just a few ingredients, and will make anyone who tries it feel cared-for.
At a Glance
- Prep Time: 10 minutes
- Cook Time: 5–8 minutes (melting time)
- Total Time: about 2 hours 10 minutes (including chilling)
- Servings: 16 small squares (adjust by cutting size)
- Difficulty Level: Easy — beginner-friendly
Nutrition Highlights
Estimated nutritional breakdown per serving (1 of 16 squares). These values are estimates based on USDA FoodData Central entries for generic chocolate chips and average product nutrition information for sweetened condensed coconut milk; actual values will vary by brand and ingredient choices.
- Calories: ~137 kcal
- Total Fat: ~6.5 g
- Saturated Fat: ~3.9 g
- Carbohydrates: ~21.0 g
- Sugars: ~20.2 g
- Fiber: ~0.3–0.5 g
- Protein: ~0.7 g
- Sodium: ~25–40 mg
Note: Sweetened condensed products and chocolate chip formulations vary widely. These estimates use widely available data from USDA FoodData Central and typical product nutrition labels; for precise tracking, check the nutrition facts on the specific brands you use.
Why You’ll Love It
- Decadent, uncomplicated indulgence: This fudge gives you the deep chocolate satisfaction of classic fudge without the fuss of tempering or multiple cooking stages.
- Fast and forgiving: With only two primary ingredients, it’s hard to go wrong, and the method is child-friendly for holiday kitchen projects.
- Great for gatherings and gifting: It slices cleanly when chilled, packages well, and is a welcome addition to cookie trays or dessert boards.
- Dietary-friendly swap: Because it uses dairy-free ingredients, it’s a gentle option for those avoiding lactose or following dairy-free diets (always verify labels for vegan/strict-dairy-free assurance).
- Nostalgia with a modern twist: The texture and flavor will transport people to childhood fudge memories while accommodating contemporary dietary needs.
How to Make Dairy Free Chocolate Fudge
Ingredients
- 1 cup dairy-free chocolate chips (approx. 170 g)
- 1 can (about 14 oz / 396 g) sweetened condensed coconut milk
Optional ingredients and substitutions
- 1/2 teaspoon vanilla extract (optional, for deeper flavor)
- 1/4 teaspoon sea salt (optional, to balance sweetness)
- 1/2 cup chopped toasted nuts (walnuts, pecans) — optional mix-in or topping
- 1–2 tablespoons cocoa powder (unsweetened) — to intensify chocolate flavor (add with chips)
- Substitute sweetened condensed coconut milk with store-bought vegan sweetened condensed milk if available; alternatively, make a homemade version (requires cooking coconut milk and sugar down)
- Use dark dairy-free chips for less sweetness; use carob chips for a caffeine-free alternative
Equipment
- Small saucepan or double boiler
- Spatula or wooden spoon
- 8×8-inch (20×20 cm) baking dish (or similar) lined with parchment paper
- Refrigerator
Directions
- In a saucepan over low heat, combine the dairy free chocolate chips and sweetened condensed coconut milk. Stir until the chocolate has melted and the mixture is smooth.
- Pour the mixture into a lined baking dish and spread it evenly.
- Refrigerate for at least 2 hours until set.
- Cut into squares and enjoy!
Practical tips while you make it
- Use low heat and stir constantly to prevent scorching. If the chocolate seems to seize, remove from direct heat and continue stirring until it smooths out.
- If using a double boiler, keep the water at a gentle simmer to avoid steam or water getting into the chocolate. Even a little water can cause chocolate to become grainy.
- For the glossiest finish, pour and use an offset spatula to smooth rapidly; the mixture firms as it cools, so work efficiently.
- Chill until fully firm; partial chilling can make cutting messy. For cleaner slices, chill fully and then allow the slab to sit out 3–5 minutes before slicing.
Serve It Up
- Plain and perfect: Serve straight from the refrigerator, small squares on a plate.
- Dusted presentation: Lightly dust the top with cocoa powder or sifted powdered sugar (use vegan powdered sugar if needed) before slicing.
- With hot beverages: Pairs wonderfully with strong coffee, espresso, or a spiced chai — the hot drink contrasts with the dense, cool fudge.
- On a dessert board: Offer alongside fresh berries, toasted nuts, and dairy-free cookies for a mixed-sweets platter.
- As a sandwich: Place a thin layer between two cookies for an indulgent sandwich treat.
- Gift-ready: Cut into uniform squares and wrap in parchment or place in mini treat boxes for gifting.
Shelf Life & Storage
- Room temperature: Best consumed within 1 day if your kitchen is cool (below ~70°F / 21°C) and kept in an airtight container. Because this fudge contains sweetened condensed coconut milk, it is safer refrigerated.
- Refrigeration: Store in an airtight container for up to 10–14 days. For best texture and freshness, use within 7–10 days.
- Freezer: Freeze for up to 2–3 months. Place parchment between layers to prevent sticking, and thaw in the refrigerator or at room temperature for 15–30 minutes before serving.
Chef’s Advice
- Quality of chocolate matters: Choose a dairy-free chocolate chip brand with good cocoa flavor; it’s the dominant taste. A higher-quality chip will give you richer, more complex fudge.
- Temperature control is key: Low, gentle heat keeps the mixture smooth. Overheating can cause separation or graininess.
- Salt balances sweetness: A light sprinkle of flaky sea salt on top immediately after pouring elevates flavor and cuts perceived sweetness.
- Mix-ins strategy: If adding nuts or dried fruit, fold them in once the chocolate is entirely melted, then press down to keep the surface smooth.
- Slice with a warm knife: Warm the blade under hot water, dry it, and slice — it gives a cleaner cut. Wipe the blade between cuts.
Creative Twists
- Espresso Maple Fudge: Add 1 teaspoon instant espresso powder and 1 tablespoon maple syrup to the melted mixture for a coffee-maple profile.
- Peppermint Holiday Fudge: Stir in 1/2 teaspoon peppermint extract and top with crushed candy canes for a festive bite (use dairy-free candy canes).
- Nutty Coconut Crunch: Mix 1/2 cup toasted shredded coconut and 1/2 cup chopped roasted almonds into the melted chocolate for texture and coconut depth.
- Sea Salt & Olive Oil Finish: Drizzle a teaspoon of extra-virgin olive oil and a pinch of flaky sea salt over the set fudge for an upscale, slightly savory finish.
- Lower-sugar option: Use unsweetened cocoa plus a measured sweetener (like erythritol or allulose) instead of sweetened condensed coconut milk; this requires careful melting and may change texture.
All Your Questions Answered
Q: Can I make this recipe vegan?
A: Yes, if you use dairy-free chocolate chips that are certified vegan and a vegan-friendly sweetened condensed coconut milk, the fudge is vegan-friendly.
Q: My fudge turned out grainy or separated — why?
A: Overheating or introducing water can cause chocolate to seize or become grainy. Use low heat and keep utensils dry; if it seizes, remove from heat and stir vigorously until it smooths.
Q: Can I double the recipe?
A: Yes—double and use a larger pan (e.g., 9×13-inch) or two 8×8 pans. Adjust chilling time as a thicker slab will take longer to set.
Q: How do I reduce the sugar?
A: Swap some or all of the sweetened condensed coconut milk for a lower-sugar vegan condensed milk alternative or experiment with low-calorie sugar substitutes (note texture may change).
Q: Will this work with regular sweetened condensed milk?
A: Yes, if dairy isn’t an issue, regular sweetened condensed milk will make a similar fudge with slightly different flavor and texture.
Conclusion
I hope this dairy free chocolate fudge recipe inspires you to try a quick, soulful chocolate treat that’s easy to make and crowd-pleasing. If you want to explore similar simple fudge methods or compare variations, check out this approachable take from 3 Ingredient Dairy Free Fudge — The Pretty Bee and another practical perspective at Super Easy Dairy-Free Fudge — Loving It Vegan. Share your results, photos, and any creative twists — I’d love to hear how your fudge turned out and what flavors you experimented with!
Print
Dairy Free Chocolate Fudge
- Total Time: 130 minutes
- Yield: 16 servings 1x
- Diet: Dairy Free
Description
This dairy-free chocolate fudge is rich, easy to make, and perfect for gatherings or as a thoughtful gift. It offers a classic fudge experience without the use of dairy ingredients.
Ingredients
- 1 cup dairy-free chocolate chips (approx. 170 g)
- 1 can (about 14 oz / 396 g) sweetened condensed coconut milk
- 1/2 teaspoon vanilla extract (optional)
- 1/4 teaspoon sea salt (optional)
- 1/2 cup chopped toasted nuts (optional)
- 1–2 tablespoons cocoa powder (optional)
Instructions
- In a saucepan over low heat, combine the dairy free chocolate chips and sweetened condensed coconut milk. Stir until the chocolate has melted and the mixture is smooth.
- Pour the mixture into a lined baking dish and spread it evenly.
- Refrigerate for at least 2 hours until set.
- Cut into squares and enjoy!
Notes
For a glossy finish, pour and smooth rapidly before cooling. Use a warm knife to slice for cleaner cuts.
- Prep Time: 10 minutes
- Cook Time: 8 minutes
- Category: Dessert
- Method: No-Bake
- Cuisine: American
Nutrition
- Serving Size: 1 square
- Calories: 137
- Sugar: 20.2g
- Sodium: 40mg
- Fat: 6.5g
- Saturated Fat: 3.9g
- Unsaturated Fat: 2.6g
- Trans Fat: 0g
- Carbohydrates: 21.0g
- Fiber: 0.5g
- Protein: 0.7g
- Cholesterol: 0mg
Printable Recipe Card
Want just the essential recipe details without scrolling through the article? Get our printable recipe card with just the ingredients and instructions.