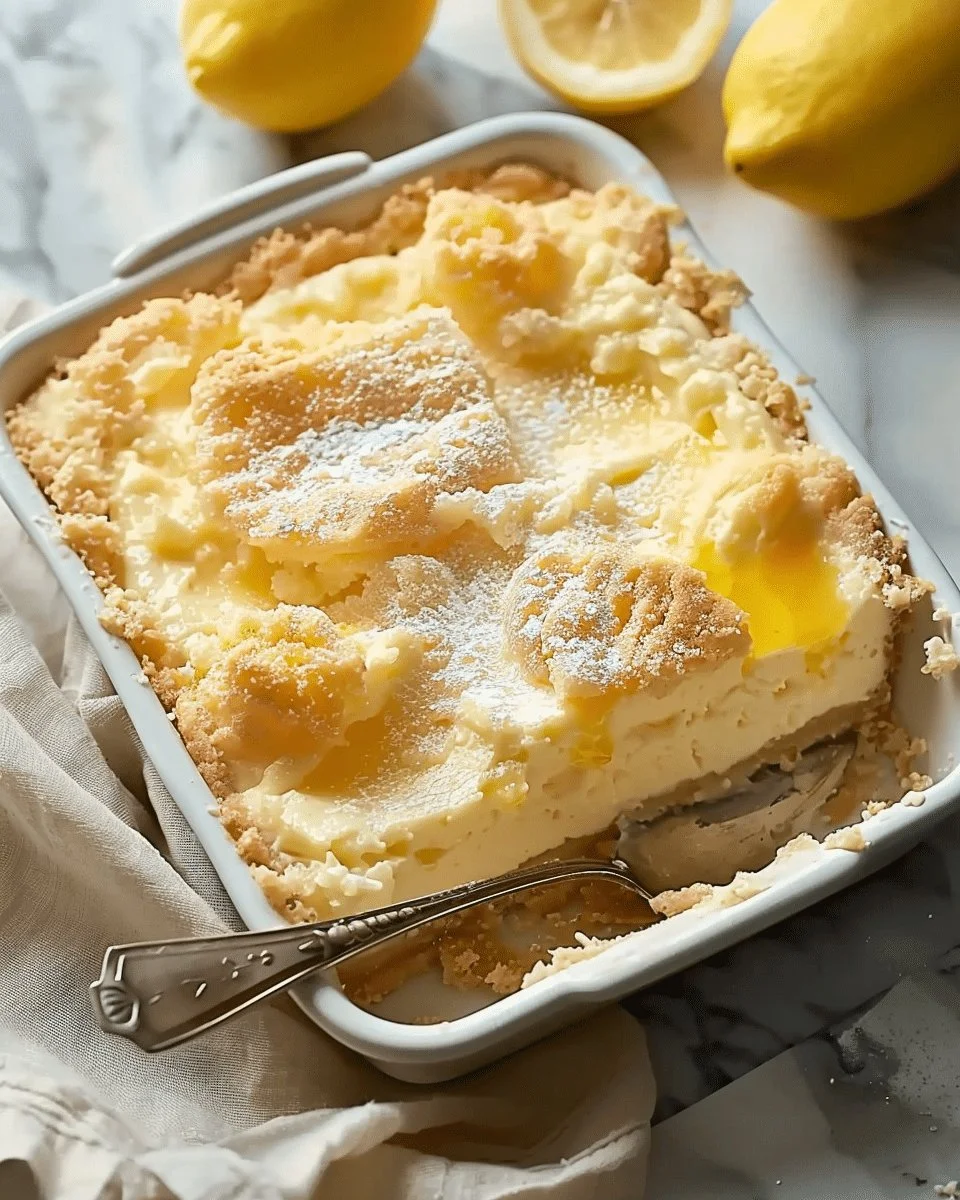
Lemon Cream Cheese Dump Cake
There are recipes that feel like sunshine on a plate, and this Lemon Cream Cheese Dump Cake is one of them. The first forkful greets you with a bright, citrusy tang that wakes the palate; beneath that zesty top, a pillowy, slightly tangy cream cheese ribbon melts into a tender, sweet crumb. The aroma as it bakes — warm lemon, butter, and a hint of vanilla — will pull people into the kitchen before the timer even dings. Texturally it’s the best kind of comfort: a crisp, golden top yielding to a soft, almost custardy center streaked with velvety cream cheese.
This is a recipe that invites cozy weekend breakfasts, casual potlucks, or an effortless dessert for a weeknight when you want something special without a long bake. It’s the kind of dish that sparks nostalgic smiles, is forgiving for new bakers, and travels well to gatherings — bright, cheerful, and reliably loved.
At a Glance
- Prep Time: 10 minutes
- Cook Time: 40–45 minutes
- Total Time: 50–55 minutes
- Servings: 12 (about 9×13-inch pan divided into 12 pieces)
- Difficulty Level: Easy — perfect for beginner bakers or busy hosts
Nutrition Highlights
Nutritional values are estimates for one serving (1/12 of the pan) and are provided as general guidance. Estimates are based on ingredient nutrition averages from USDA FoodData Central and standard product labels; actual values will vary by brands and exact measurements.
Per serving (approximate):
- Calories: 470 kcal
- Protein: 4 g
- Total Carbohydrates: 74 g
- Sugars: 43 g
- Dietary Fiber: 1 g
- Total Fat: 16 g
- Saturated Fat: 9 g
- Sodium: 350 mg
Note: These are estimates. For detailed dietary planning or medical concerns, consult resources such as USDA FoodData Central or your healthcare provider.
Why You’ll Love It
- Effortless brilliance: This dump cake delivers show-stopping flavor with minimal hands-on time. No mixing bowls full of batter — layers are assembled simply and baked to golden perfection.
- Joyful contrast: The tartness of lemon pie filling and the cool creaminess of cream cheese create a lovely sweet-tart balance that keeps each bite interesting.
- Crowd-pleaser: It’s familiar yet special — perfect for family breakfasts, office potlucks, or a last-minute dessert for guests.
- Comfort with a bright twist: If you want a dessert that feels comforting but isn’t heavy or overly rich, this lemon-forward cake does both.
How to Make Lemon Cream Cheese Dump Cake
Ingredients:
- 1 box yellow cake mix (standard 15.25 oz box)
- 1 (21 oz) can lemon pie filling
- 8 oz cream cheese, softened
- ½ cup butter, melted (1 stick)
- 1 cup powdered sugar
Optional ingredients and substitutions:
- Use lemon cake mix instead of yellow for extra lemon flavor.
- Substitute Greek yogurt (4 oz) for half the cream cheese to reduce richness (texture will be slightly lighter).
- For a gluten-free version, use a gluten-free yellow cake mix.
- Swap powdered sugar for a granulated sugar + cornstarch blend? Not recommended — powdered sugar gives smoother cream cheese mixture.
- Add 1 tsp vanilla extract or 1 tsp lemon zest to the cream cheese mixture for extra aroma.
Directions:
- Preheat your oven to 350°F (175°C) and lightly grease a 9×13-inch baking dish.
- Spread the lemon pie filling evenly in the prepared dish. Use a spatula to create a smooth layer.
- In a medium bowl, beat the softened cream cheese and powdered sugar until smooth and without lumps. (A handheld mixer or stand mixer helps.)
- Drop spoonfuls of the cream cheese mixture over the lemon filling and gently spread as much as possible in an even layer; it’s okay if some filling shows through.
- Sprinkle the dry yellow cake mix evenly over the cream cheese layer — no mixing required.
- Drizzle the melted butter across the top, trying to cover the cake mix as evenly as possible. This helps the top bake into a crisp, golden crust.
- Bake for 40–45 minutes, until the top is golden and you can see bubbling around the edges. A toothpick inserted into the cake mix top should come out mostly clean (a few moist crumbs are fine).
- Let the cake cool slightly (at least 15 minutes) before cutting to allow the layers to set. Serve warm or at room temperature.
Practical tips:
- Don’t overmix the cream cheese and powdered sugar — beat just until smooth. Overbeating can change texture.
- If the top is browning too quickly, tent with foil for the last 10–15 minutes.
- Letting the cake rest helps the cream cheese ripple set; cutting too-hot slices may be gooey and less tidy.
Best Pairings
- Serve warm with a scoop of vanilla ice cream or a dollop of lightly sweetened whipped cream for contrast.
- Pair a slice with a cup of strong black coffee or Earl Grey tea — the citrus cuts through richness.
- For brunch, accompany with fresh berries and lemon zest for brightness.
- Add a light dusting of powdered sugar and a few mint leaves for an elegant presentation at gatherings.
Storing Leftovers
- Room temperature: If kept covered (airtight container or wrapped), the cake is fine for up to 1 day at room temperature in a cool area.
- Refrigeration: Store in an airtight container for up to 4–5 days. Because of the cream cheese element, refrigeration is recommended if you won’t finish it within a day.
- Freezer: You can freeze portions wrapped tightly in plastic and foil for up to 2 months. Thaw overnight in the refrigerator, then bring to room temperature or warm briefly before serving.
Insider Secrets
- Use full-fat cream cheese for the best texture and flavor; reduced-fat versions can become grainy when mixed with sugar.
- Let the melted butter cool slightly before drizzling so it doesn’t sink too quickly into the cake mix — but don’t let it re-solidify.
- For an extra-bright lemon hit, grate a little lemon zest over the cream cheese layer before sprinkling the cake mix.
- To ensure even bubbling and avoid soggy spots, spread the lemon filling in an even layer and distribute the cream cheese in many small dollops before smoothing.
Creative Twists
- Lemon Blueberry Dump Cake: Fold 1–1½ cups fresh or frozen blueberries into the lemon pie filling for bursts of fruity contrast.
- Lemon Raspberry Swirl: Use half lemon and half raspberry pie filling for a sweeter-tart combo; raspberries add jewel-toned color and a flavor lift.
- Lighter Version: Replace half the butter with unsweetened applesauce and use reduced-fat cream cheese to cut calories; texture will be softer and less crisp on top.
- Boozy Brightness: Stir 1–2 tbsp limoncello or orange liqueur into the cream cheese mixture for a grown-up touch.
- Gluten-Free or Vegan: Use a certified gluten-free cake mix. For a vegan option, use vegan cream cheese, dairy-free butter, and a vegan yellow cake mix — results vary by brand.
All Your Questions Answered
Q: Can I use a different flavor of pie filling?
A: Yes. Cherry, apple, or peach will work, but the lemon + cream cheese combination is distinctive. Adjust sweetness accordingly.
Q: The top is soggy — what went wrong?
A: Likely uneven butter coverage or too much filling in places. Ensure the butter is evenly drizzled and that the filling and cream cheese layers are fairly even before adding the dry mix.
Q: Can I prepare this ahead?
A: Assemble and refrigerate (covered) for up to 24 hours; add the butter and bake when ready. Baking straight from the fridge may add a few extra minutes.
Q: How can I make it less sweet?
A: Use a light-yellow cake mix or reduce powdered sugar in the cream cheese mixture by 2–3 tablespoons. Using a tart lemon pie filling (if available) helps balance sweetness.
Q: Is it freezer-friendly?
A: Yes — freeze individual slices wrapped tightly for up to 2 months. Thaw overnight in the fridge and warm gently before serving.
Conclusion
If you want a bright, no-fuss dessert that still feels celebratory, this Lemon Cream Cheese Dump Cake is a dependable go-to. It’s fast to assemble, comforting to eat, and flexible enough for creative variations. Give it a try for your next brunch or casual dinner — and don’t forget to share photos and tips with friends.
For an alternate riff and step photos, see this helpful version from 4-Ingredient Lemon Cream Cheese Dump Cake | 12 Tomatoes, and for another tested method and notes, check out Lemon Cream Cheese Dump Cake Recipe | The Kitchn.
Print
Lemon Cream Cheese Dump Cake
- Total Time: 55 minutes
- Yield: 12 servings 1x
- Diet: Vegetarian
Description
A bright and zesty lemon cake with a creamy cream cheese ribbon, perfect for any occasion.
Ingredients
- 1 box yellow cake mix (15.25 oz)
- 1 can lemon pie filling (21 oz)
- 8 oz cream cheese, softened
- ½ cup butter, melted (1 stick)
- 1 cup powdered sugar
Instructions
- Preheat your oven to 350°F (175°C) and lightly grease a 9×13-inch baking dish.
- Spread the lemon pie filling evenly in the prepared dish.
- In a medium bowl, beat the softened cream cheese and powdered sugar until smooth.
- Drop spoonfuls of the cream cheese mixture over the lemon filling and gently spread it out.
- Sprinkle the dry cake mix evenly over the cream cheese layer.
- Drizzle the melted butter across the top.
- Bake for 40–45 minutes, until golden and bubbling.
- Let cool for at least 15 minutes before cutting and serving.
Notes
For extra lemon flavor, use lemon cake mix. Best served warm with ice cream or whipped cream.
- Prep Time: 10 minutes
- Cook Time: 45 minutes
- Category: Dessert
- Method: Baking
- Cuisine: American
Nutrition
- Serving Size: 1 serving
- Calories: 470
- Sugar: 43g
- Sodium: 350mg
- Fat: 16g
- Saturated Fat: 9g
- Unsaturated Fat: 5g
- Trans Fat: 0g
- Carbohydrates: 74g
- Fiber: 1g
- Protein: 4g
- Cholesterol: 30mg
Printable Recipe Card
Want just the essential recipe details without scrolling through the article? Get our printable recipe card with just the ingredients and instructions.