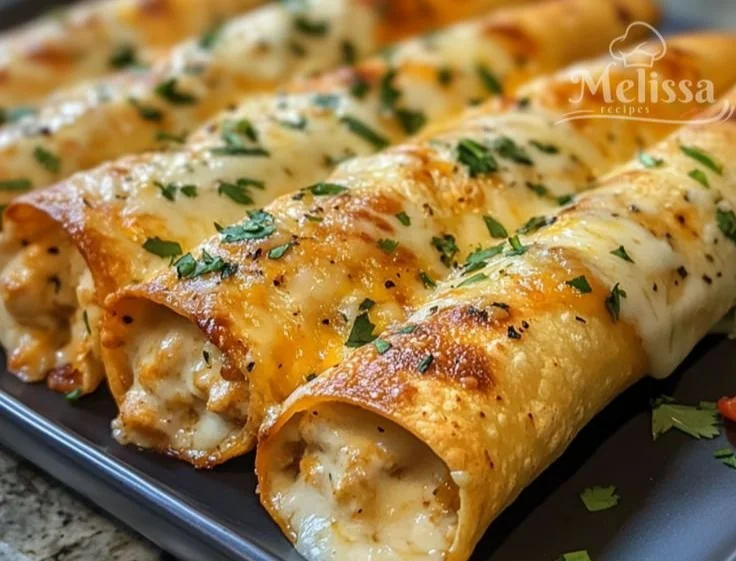
A Warm, Cheesy Bite: Cheesy Garlic Chicken Wraps
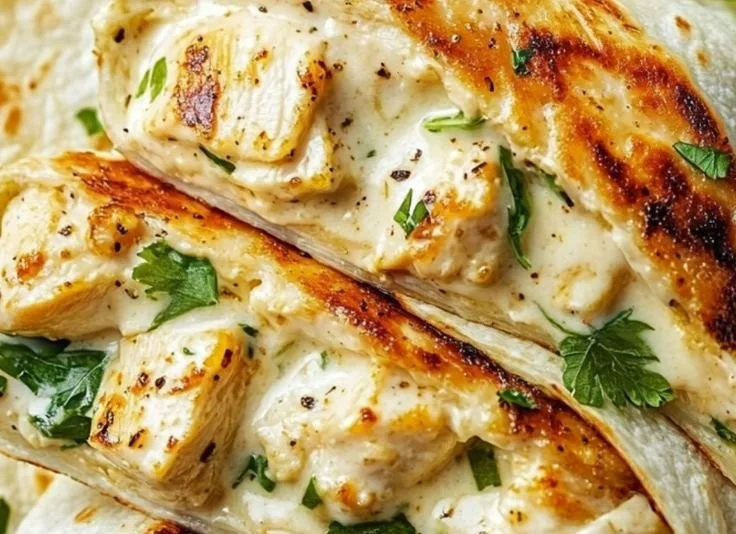
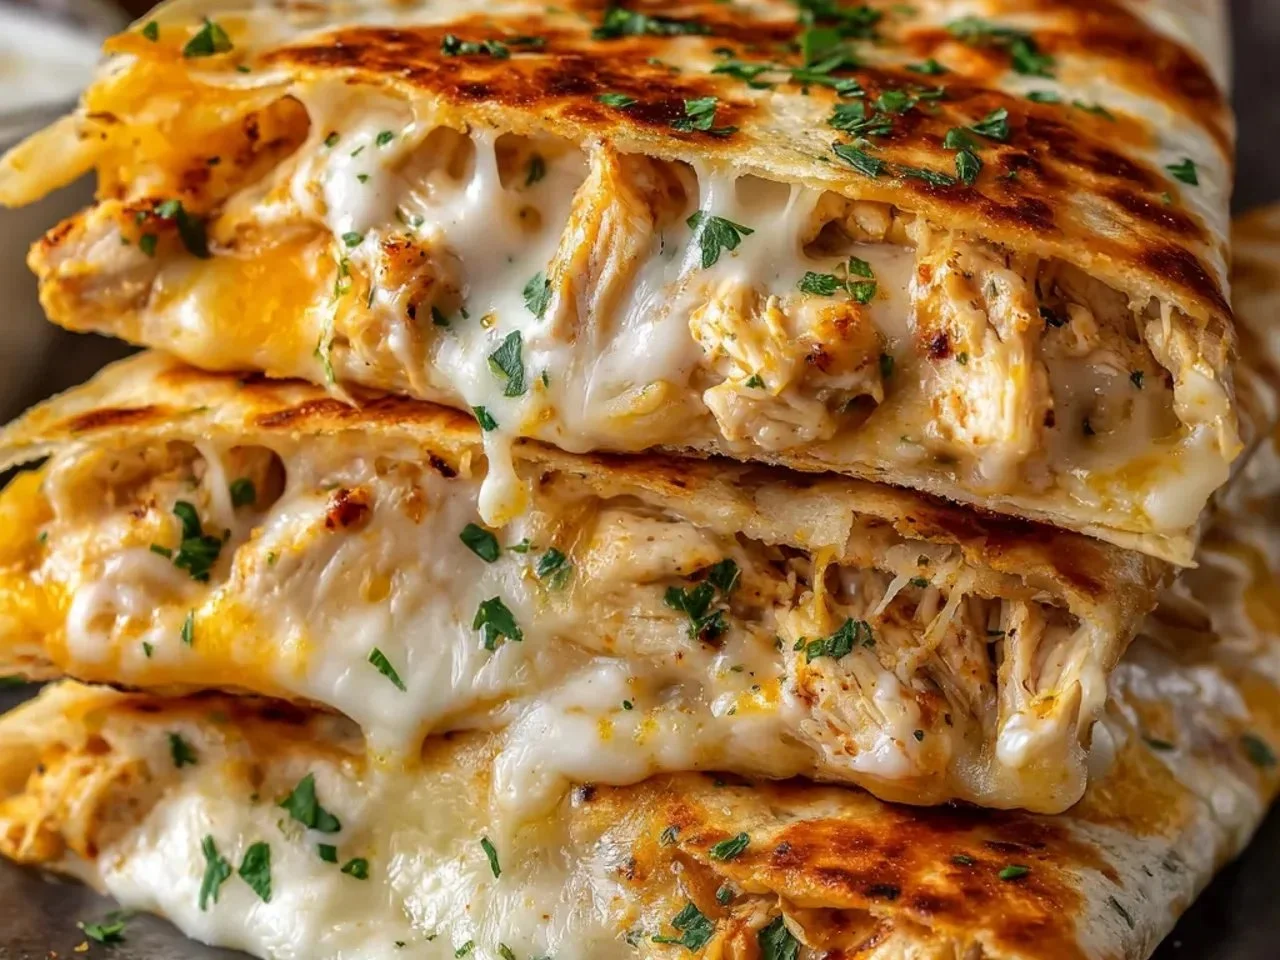
Imagine pulling a golden, crisp wrap from a hot skillet—steam rises, rich garlic and melted cheese perfume the air, and the first bite gives a satisfying crunch followed by tender, juicy chicken and an ooze of creamy mozzarella and cheddar. The creamy garlic notes, herby parsley brightness, and the buttery-toasted tortilla come together like a comforting hug for your taste buds.
This Cheesy Garlic Chicken Wrap is the kind of food that feels like home and travels well: perfect for busy weeknight dinners, picnic baskets, game-day gatherings, or an easy lunch that still feels special. If you love handheld comfort food that’s quick to assemble but indulgent to eat, this wrap is your new go-to. For a slightly different take or extra background on similar wraps, see this handy comparison to other cheesy chicken wrap riffs: a similar cheesy chicken garlic wrap.
At a Glance
- Prep time: 10 minutes
- Cook time: 8–10 minutes (skillet to toast)
- Total time: 18–20 minutes
- Servings: 4 wraps
- Difficulty level: Easy — great for cooks of any skill level
Nutritional Breakdown
Below are approximate nutrition estimates per serving (one wrap). These values were calculated from standard ingredient values and USDA FoodData Central entries; for context on portion guidance see resources from the Mayo Clinic and the CDC.
- Calories: ~650 kcal
- Protein: ~42 g
- Carbohydrates: ~30 g
- Fat: ~38 g
- Saturated fat: ~15–18 g
- Fiber: ~2–3 g
- Sodium: ~900–1,100 mg
Notes: These are estimates and will vary by brands, exact tortilla size, and optional add-ins. If you need precise numbers for medical or diet-tracking purposes, weigh your ingredients and consult USDA FoodData Central or nutrition labels from the specific products you use.
Why You’ll Love It
- Comfort with speed: Melty cheese and well-seasoned chicken give you maximum flavor with minimal fuss—ready in under 20 minutes once your chicken is cooked.
- Crowd-pleasing: The combination of familiar flavors (garlic, mozzarella, cheddar) is universally appealing—perfect for casual parties or after-school hunger.
- Versatile and portable: Serve it warm from the skillet, wrap it up for lunch on the go, or make a double batch to feed a small crowd.
- Balanced satisfaction: High in protein from the chicken and cheeses, these wraps keep you full and satisfied while still being customizable to lighter or heartier preferences.
How to Make Cheesy Garlic Chicken Wraps
Ingredients
- 2 cups cooked shredded or chopped chicken (≈280 g cooked)
- 1 tablespoon olive oil
- 1 teaspoon garlic powder
- 1/2 teaspoon onion powder
- Salt and black pepper, to taste
- 1 1/2 cups shredded mozzarella cheese (≈170 g)
- 1/2 cup shredded cheddar cheese (≈56 g)
- 1/4 cup softened cream cheese (≈56 g)
- 2 tablespoons mayonnaise
- 2 tablespoons chopped fresh parsley or 1 teaspoon dried parsley
- 4 large flour tortillas
- 2 tablespoons melted butter
- 1 teaspoon minced garlic
- Optional: Baby spinach, shredded lettuce, or sliced tomatoes
Substitutions & optional ingredients
- Dairy-free: Use vegan cream cheese, dairy-free shredded cheese, and a plant-based mayo.
- Lower-fat: Swap full-fat cheeses for part-skim mozzarella and use light mayo or Greek yogurt.
- Gluten-free: Use gluten-free tortillas (adjust to size/calories).
- Extra flavor: Add a pinch of smoked paprika, red pepper flakes, or a squeeze of lime for brightness.
Internal note: If you want a version with slightly different ingredient amounts and conversion tips, check this additional guide: ingredient conversion and alternate method.
Method — Step-by-step
- In a mixing bowl, combine the cooked chicken, olive oil, garlic powder, onion powder, salt, and black pepper. Toss to coat evenly.
- Add the mozzarella, cheddar, cream cheese, mayonnaise, and chopped parsley to the bowl. Mix until the filling is creamy and cohesive—take care not to overmix to preserve some texture in the chicken.
- Place the tortillas on a flat clean surface. Spoon about 1/4 of the filling into the center of each tortilla. If using, add a handful of baby spinach or some sliced tomatoes on top of the filling.
- Fold the sides inward and roll tightly from the bottom to form neat wraps. Press lightly to seal.
- In a small bowl, mix the melted butter with the minced garlic. Brush the outside of each wrap generously with the garlic butter mixture.
- Heat a skillet over medium heat. Place each wrap seam-side down and toast for 2–3 minutes per side until the tortilla is golden brown and crisp and the cheese inside is melted. Use a spatula to press gently while toasting for more even browning.
- Remove from heat, slice each wrap in half on the diagonal, and serve warm with a dipping sauce such as ranch, garlic aioli, or salsa.
Practical tips
- Avoid overfilling: Too much filling makes wraps hard to seal and can cause leaking while toasting.
- Check doneness visually: Look for golden-brown tortilla and melted cheese oozing slightly at the seam.
- Use a non-stick skillet or light oil/butter to prevent sticking.
- Make ahead: You can assemble and refrigerate un-toasted wraps up to 24 hours; toast just before serving for the crispiest result.
Best Pairings
- Dipping sauces: Ranch dressing, garlic aioli, chipotle mayo, or a fresh tomato salsa.
- Side salads: A crisp Caesar or a tangy slaw to cut through the richness.
- Drinks: Iced tea, lemonade, or a light lager for a casual meal; a full-bodied iced coffee works well for brunch.
- Snack style: Serve halved wraps on a platter with pickles and raw veggie sticks for parties.
Storage Instructions
- Room temperature: Best enjoyed immediately; do not leave perishable wraps at room temperature for more than 2 hours.
- Refrigerator: Store cooled, un-toasted or leftover toasted wraps in an airtight container for up to 3 days. Reheat in a skillet or oven at 350°F (175°C) until heated through and crisp.
- Freezer: Wrap each assembled but un-toasted wrap tightly in foil and place in a freezer bag—store for up to 2 months. Thaw overnight in the fridge, then toast in a skillet or oven until warmed and crisp.
Chef’s Advice
- Cheese balance: Use a blend of mozzarella for stretch and cheddar for sharp flavor—this contrast is what makes the filling sing.
- Texture cues: If the chicken filling seems watery, drain any excess juices and fold in the cheeses to bind; cream cheese helps stabilize moist mixtures.
- Toasting trick: For ultra-crisp tortillas, press with a heavy spatula or place a lid over the skillet to evenly heat and melt cheese faster, then finish uncovered to crisp.
- Make it ahead: Assemble the filling in advance and refrigerate; fill and toast just before serving to preserve the best texture.
Recipe Variations
- BBQ Cheesy Chicken Wrap: Mix 1/4 cup barbecue sauce into the filling and swap parsley for thinly sliced red onion and cilantro. Serve with extra BBQ sauce for dipping.
- Mediterranean Twist: Replace cheddar/mozzarella with crumbled feta and shredded provolone; add chopped roasted red peppers and a smear of tzatziki.
- Vegetarian Version: Swap shredded chicken for shredded, seasoned roasted cauliflower or cooked chickpeas, and use vegan cheeses and mayo for a plant-based option.
- Low-Carb Option: Use large lettuce leaves (romaine or butter lettuce) or low-carb tortillas; reduce mayonnaise and cream cheese for lighter texture.
Frequently Asked Questions
Q: Can I use rotisserie chicken?
A: Yes—rotisserie chicken is a great time-saver. Just shred it and adjust salt since store-bought rotisserie can be salty.
Q: How do I stop the wraps from getting soggy?
A: Don’t overfill with wet ingredients; toast just before serving; add fresh veggies like lettuce at the last moment, and use cream cheese or mayo as binders to limit runoff.
Q: Can I make these ahead for a party?
A: Assemble them and keep un-toasted in the fridge up to 24 hours. Toast right before serving for best texture.
Q: Are there healthier versions of this wrap?
A: Yes—use part-skim mozzarella, light mayo or Greek yogurt, whole-wheat or low-carb tortillas, and add plenty of fresh greens to increase fiber.
Q: How can I reheat them without losing crispness?
A: Reheat in a skillet over medium heat or in a 350°F oven for 8–10 minutes. Avoid microwaving if you want to keep the outside crisp.
Conclusion
Give these Cheesy Garlic Chicken Wraps a try the next time you want a fast, comforting meal that’s great for sharing—then tell me how you customized yours. For a closely related take and presentation ideas, you might enjoy the original Cheesy Garlic Chicken Wraps inspiration from this blog: Cheesy Garlic Chicken Wraps, and for another tasty variation and serving suggestions see this flavorful spin-off: Cheesy Chicken Wraps | Spicedblog.
If you make these, snap a photo and share it—I love seeing your spins and swaps. Happy cooking!
Print
Cheesy Garlic Chicken Wraps
- Total Time: 20 minutes
- Yield: 4 wraps 1x
- Diet: None
Description
Deliciously cheesy and packed with tender chicken, these wraps are quick to prepare and perfect for any occasion.
Ingredients
- 2 cups cooked shredded or chopped chicken (≈280 g cooked)
- 1 tablespoon olive oil
- 1 teaspoon garlic powder
- 1/2 teaspoon onion powder
- Salt and black pepper, to taste
- 1 1/2 cups shredded mozzarella cheese (≈170 g)
- 1/2 cup shredded cheddar cheese (≈56 g)
- 1/4 cup softened cream cheese (≈56 g)
- 2 tablespoons mayonnaise
- 2 tablespoons chopped fresh parsley or 1 teaspoon dried parsley
- 4 large flour tortillas
- 2 tablespoons melted butter
- 1 teaspoon minced garlic
- Optional: Baby spinach, shredded lettuce, or sliced tomatoes
Instructions
- In a mixing bowl, combine the cooked chicken, olive oil, garlic powder, onion powder, salt, and black pepper. Toss to coat evenly.
- Add the mozzarella, cheddar, cream cheese, mayonnaise, and chopped parsley to the bowl. Mix until the filling is creamy and well combined.
- Place the tortillas on a flat clean surface. Spoon about 1/4 of the filling into the center of each tortilla and add any optional ingredients (like spinach or tomatoes) on top.
- Fold the sides inward and roll tightly from the bottom to create neat wraps. Press lightly to seal.
- In a small bowl, mix the melted butter with the minced garlic. Brush the outside of each wrap with the garlic butter mixture.
- Heat a skillet over medium heat. Place each wrap seam-side down and toast for 2–3 minutes per side until golden brown and crispy. Press gently while toasting for even browning.
- Remove from heat, slice each wrap in half, and serve warm with a dipping sauce.
Notes
Avoid overfilling wraps and use a non-stick skillet or oil to prevent sticking. Can be assembled ahead of time and stored in the fridge for up to 24 hours.
- Prep Time: 10 minutes
- Cook Time: 10 minutes
- Category: Main Course
- Method: Skillet
- Cuisine: American
Nutrition
- Serving Size: 1 wrap
- Calories: 650
- Sugar: 3g
- Sodium: 1000mg
- Fat: 38g
- Saturated Fat: 15g
- Unsaturated Fat: 7g
- Trans Fat: 0g
- Carbohydrates: 30g
- Fiber: 2g
- Protein: 42g
- Cholesterol: 100mg
Printable Recipe Card
Want just the essential recipe details without scrolling through the article? Get our printable recipe card with just the ingredients and instructions.