At a Glance
Prep Time: 15 minutes
Cook Time: 18 minutes (bake 15–20 minutes; optional broil 1–2 minutes)
Total Time: 33–35 minutes
Servings: 4 (8 taquitos — 2 per person)
Difficulty Level: Easy — great for beginners and busy cooks
Introduction
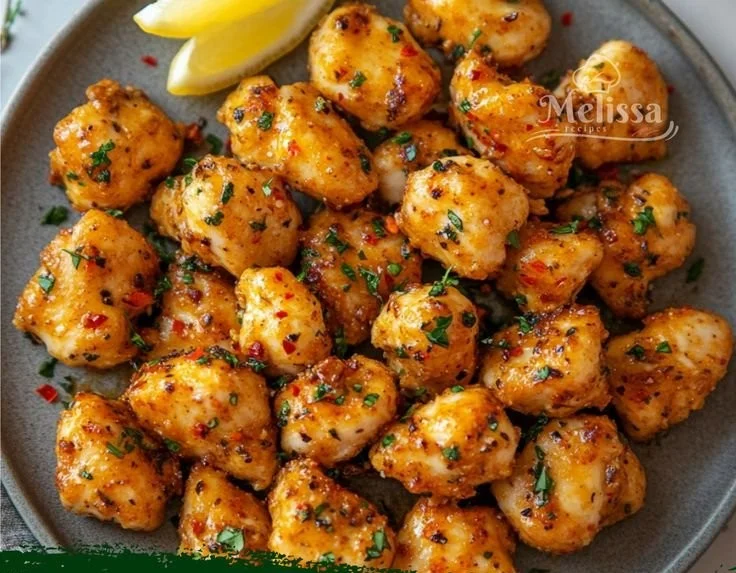
Imagine the warm, inviting scent of toasted tortillas, the sharp tang of melted cheddar mingling with smoky cumin and a bright hit of salsa — then a crisp snap as you bite into a golden taquito that releases a steamy, creamy chicken filling. These Crispy Chicken Taquitos are all about contrast: crunchy exterior, silky cream-cheese-studded interior, savory chicken, and that playful pop of fresh cilantro and lime on top. They’re the kind of food that makes a weeknight feel special and a party spread instantly more exciting.
Whether you’re crafting a quick family dinner, assembling a crowd-pleasing appetizer for game day, or packing party platters for a casual gathering, these taquitos deliver comfort and excitement in every bite. They’re versatile, freezer-friendly, and—best of all—simple enough that you can make a batch after work and still have time to relax before serving.
Nutrition Highlights
Estimated nutrition per serving (1 serving = 2 taquitos). Values are estimates based on ingredient averages from USDA FoodData Central and common product nutrition labels; actual values will vary by specific brands and tortilla choice.
- Calories: ~470 kcal
- Protein: ~36 g
- Carbohydrates: ~32 g
- Dietary Fiber: ~3–4 g
- Sugars: ~2–4 g
- Fat: ~22 g
- Saturated Fat: ~10 g
- Sodium: ~700–900 mg
Notes on accuracy and sources:
- These numbers are approximate. Calculations used typical values for cooked chicken breast, full-fat cream cheese, shredded cheddar, and 6-inch flour tortillas as found in USDA FoodData Central; salsa and product brands alter totals. For lower calories or sodium, choose low-fat dairy and low-sodium tortillas or salsa. For scientifically vetted guidance on portion sizes, dietary fats, and sodium limits, consult sources such as the U.S. Department of Agriculture (USDA) and the Centers for Disease Control and Prevention (CDC).
Why You’ll Love It
- Irresistible flavor and texture: Creamy, spiced chicken wrapped tightly and baked until the shells are irresistibly crunchy — it’s a perfect savory bite.
- Speed and ease: Uses rotisserie or leftover chicken to cut prep to a minimum. Filling comes together in one bowl.
- Crowd-pleasing and shareable: Great for casual gatherings, potlucks, or weeknight dinners where everyone can customize dipping sauces.
- Comfort food with room to lighten up: Keep the flavors but swap a few ingredients (low-fat cream cheese, corn tortillas) for a lighter version without losing the essence.
Step-by-Step Instructions
Ingredients
- 2 cups cooked shredded chicken (rotisserie chicken works great)
- 4 oz cream cheese, softened
- ½ cup shredded cheddar or Mexican blend cheese
- ¼ cup salsa (mild or spicy)
- ½ tsp garlic powder
- ½ tsp chili powder
- ½ tsp ground cumin
- Salt and black pepper to taste
- 8 small flour or corn tortillas (6-inch or similar)
- Cooking spray or oil (for brushing)
Optional toppings and garnishes: - Chopped cilantro
- Sour cream
- Guacamole
- Extra shredded cheese
Substitutions: - Use Greek yogurt instead of some or all cream cheese for tang and fewer calories.
- For gluten-free, choose small corn tortillas that are labeled gluten-free.
- Swap shredded chicken for shredded rotisserie turkey or cooked jackfruit for a vegetarian twist (see variations).
Preparation
- Preheat oven to 425°F (220°C). Line a baking sheet with parchment paper or lightly grease it.
- In a large bowl, combine shredded chicken, softened cream cheese, shredded cheese, salsa, garlic powder, chili powder, cumin, salt, and pepper. Mix until evenly combined — it should be spreadable but not soupy.
- Warm the tortillas in the microwave for about 20 seconds (stacked and wrapped in a damp paper towel) to make them pliable. This prevents cracking when you roll.
- Spoon 2–3 tablespoons of the filling onto one side of each tortilla (closer to the edge), then roll tightly and place seam-side down on the prepared baking sheet.
- Lightly brush each taquito with oil or spray with cooking spray to encourage even browning and crisping.
- Bake for 15–20 minutes, or until the taquitos are golden brown and crispy. For extra crunch, broil 1–2 minutes at the end — watch carefully to avoid burning.
- Serve warm with sour cream, guacamole, extra shredded cheese, and a sprinkle of chopped cilantro.
Practical tips
- Don’t overfill the tortillas: too much filling makes them hard to seal and can cause sogginess.
- Use a parchment-lined baking sheet and leave space between taquitos so hot air circulates for full crispness.
- If your tortillas crack when rolling, warm them a little longer or use a damp towel while rolling.
- To get extra uniform browning, rotate the sheet once halfway through baking.
Best Pairings
- Classic dips: sour cream, guacamole, pico de gallo, or a cool cilantro-lime crema.
- Fresh sides: a simple shredded cabbage slaw dressed with lime juice and olive oil, or a crisp mixed green salad to balance richness.
- Beverages: Mexican lager, light margaritas, or iced tea for casual meals; coffee or a bright café con leche works if serving these at brunch.
- For a heartier meal: add Mexican rice and black beans on the side or serve with a warm bowl of tortilla soup.
Storing Leftovers
- Room temperature: For safety, do not leave taquitos at room temperature for more than 2 hours (per USDA food safety guidance).
- Refrigeration: Store in an airtight container for up to 3–4 days. Recrisp in a 375°F (190°C) oven for 8–10 minutes, or 2–3 minutes under the broiler, until heated through and crispy.
- Freezer: Arrange taquitos on a baking sheet to flash-freeze for 1 hour, then transfer to a freezer-safe bag or container. Freeze for up to 2 months. Reheat from frozen in a 400°F (200°C) oven for 15–20 minutes, flipping once, until heated through and crisp.
Chef’s Advice
- For the crispiest result, brush with a thin layer of oil rather than cooking spray — oil promotes more even browning.
- Use low-moisture shredded cheese to minimize excess liquid. If your filling seems watery, add a couple extra tablespoons of shredded cheese or a small amount of breadcrumbs to bind.
- Don’t overcrowd the sheet pan; good airflow equals better crunch.
- If you’re making a big batch, assemble and freeze before baking. Bake from frozen with a few extra minutes of cook time.
- To make rolling easier for corn tortillas, lightly fry or char them briefly in a skillet to increase pliability before filling.
Creative Twists
- Buffalo Chicken Taquitos: Mix cooked shredded chicken with buffalo sauce and blue cheese crumbles or ranch dressing in place of salsa and use Monterey Jack for melty goodness. Serve with celery sticks and ranch dip.
- Black Bean & Sweet Potato (Vegetarian): Roast mashed sweet potato, add black beans, cumin, smoked paprika, and a spoonful of cream cheese or mashed avocado for binding. Top with pickled red onion.
- Mediterranean Twist: Replace the spices with oregano and smoked paprika, swap salsa for a spoon of tzatziki, and use crumbled feta and chopped spinach for a Greek-inspired roll.
- Cheesy Ranch & Bacon: Stir in cooked, crumbled bacon and ranch seasoning with the filling for a decadent party version.
- Gluten-Free: Use warmed corn tortillas (choose thicker, flexible varieties) and increase the drying/crisping time slightly to avoid soggy shells.
Frequently Asked Questions
Q: Can I use corn tortillas instead of flour?
A: Yes. Warm corn tortillas longer (or briefly char in a skillet) to make them pliable. Corn will give a slightly different texture and flavor but is an excellent gluten-free option.
Q: How can I make these healthier?
A: Use reduced-fat cream cheese or Greek yogurt, low-fat shredded cheese, lean chicken breast, and whole-grain or low-carb tortillas. Reduce added salt and pick a low-sodium salsa.
Q: My taquitos were soggy — what went wrong?
A: Likely causes are overfilling, excess moisture in the filling (drain salsa or pat chicken dry), or overcrowding on the baking sheet. Bake on a single layer with space around each taquito and brush with oil for crisping.
Q: Can I freeze baked taquitos?
A: Yes. Baked taquitos freeze well for up to 2 months. Cool completely, flash-freeze on a sheet, then transfer to freezer bags. Reheat from frozen in a hot oven to maintain crispness.
Q: What’s the best dipping sauce?
A: It depends on your preference: tangy sour cream, chunky guacamole, zesty salsa verde, or a smoky chipotle crema all work beautifully.
Conclusion
Ready to make a batch? These Crispy Chicken Taquitos are fast, satisfying, and endlessly adaptable — perfect for dinners, snacks, or entertaining. If you want a different baked taquito method or extra freezer-friendly tips, this recipe comparison from Easy Chicken Taquitos – Tastes Better From Scratch and the practical freezer-friendly approach at Crispy Baked Chicken Taquitos (Easy & Freezer-Friendly!) are great companion reads.
If you try the recipe, leave a comment with your favorite fillings and photos — I love seeing your twists and serving ideas. Happy rolling and enjoy the crunch!
Print
Crispy Chicken Taquitos
- Total Time: 33 minutes
- Yield: 4 servings (8 taquitos) 1x
- Diet: None
Description
Delicious crispy taquitos filled with creamy chicken, cheddar cheese, and spices, baked to golden perfection.
Ingredients
- 2 cups cooked shredded chicken (rotisserie chicken works great)
- 4 oz cream cheese, softened
- ½ cup shredded cheddar or Mexican blend cheese
- ¼ cup salsa (mild or spicy)
- ½ tsp garlic powder
- ½ tsp chili powder
- ½ tsp ground cumin
- Salt and black pepper to taste
- 8 small flour or corn tortillas (6-inch or similar)
- Cooking spray or oil (for brushing)
- Optional toppings: Chopped cilantro, sour cream, guacamole, extra shredded cheese
Instructions
- Preheat oven to 425°F (220°C). Line a baking sheet with parchment paper or lightly grease it.
- In a large bowl, combine shredded chicken, softened cream cheese, shredded cheese, salsa, garlic powder, chili powder, cumin, salt, and pepper. Mix until evenly combined.
- Warm the tortillas in the microwave for about 20 seconds (stacked and wrapped in a damp paper towel) to make them pliable.
- Spoon 2–3 tablespoons of the filling onto one side of each tortilla, then roll tightly and place seam-side down on the prepared baking sheet.
- Lightly brush each taquito with oil or spray with cooking spray.
- Bake for 15–20 minutes, or until the taquitos are golden brown and crispy. For extra crunch, broil 1–2 minutes at the end.
- Serve warm with optional toppings.
Notes
For the crispiest result, brush with oil rather than cooking spray. Use low-moisture cheese to avoid excess liquid.
- Prep Time: 15 minutes
- Cook Time: 18 minutes
- Category: Appetizer
- Method: Baking
- Cuisine: Mexican
Nutrition
- Serving Size: 2 taquitos
- Calories: 470
- Sugar: 3g
- Sodium: 800mg
- Fat: 22g
- Saturated Fat: 10g
- Unsaturated Fat: 12g
- Trans Fat: 0g
- Carbohydrates: 32g
- Fiber: 4g
- Protein: 36g
- Cholesterol: 70mg
Printable Recipe Card
Want just the essential recipe details without scrolling through the article? Get our printable recipe card with just the ingredients and instructions.