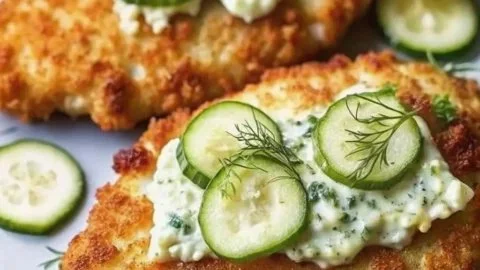
Crispy Dill Pickle Parmesan Chicken
There’s something about the first bite of this Crispy Dill Pickle Parmesan Chicken that stops conversation: a bright tang from pickle brine, the savory umami of Parmesan, and a satisfying crunch that yields to tender, juicy chicken. The aroma as it fries—warm buttered bread notes, toasted cheese, and that faintly vinegary tang—pulls you to the skillet before the timer even dings. It’s playful and comforting at once: bold enough to headline a casual dinner, nostalgic enough to spark smiles at a backyard gathering.
This recipe is perfect for weeknight dinners when you want a quick crowd-pleaser, for serving at game-day get-togethers, or for a playful weekend brunch alongside coffee. If you enjoy a crunchy, tang-forward twist on comfort food, pair this dish with other crunchy favorites like my take on crispy chicken Parmesan bites for a full, craveable spread.
At a Glance
- Prep Time: 10 minutes active (plus 30 minutes–2 hours marinating)
- Cook Time: 10–14 minutes
- Total Time: 40 minutes–2 hours 14 minutes (including marinating)
- Servings: 4
- Difficulty Level: Easy–Moderate (basic breading + pan-frying)
Nutrition Highlights
Estimated nutrition per serving (1 of 4):
Note: These are estimates based on standard ingredient values from USDA FoodData Central and rounded for readability. Actual values will vary with chicken breast size, breadcrumb brand, and oil absorption.
- Calories: ~600 kcal
- Protein: ~55 g
- Carbohydrates: ~32 g
- Fat: ~29 g
- Fiber: ~1–2 g
- Sodium: ~900–1,200 mg (can be high due to pickle juice, seasoned breadcrumbs, and Parmesan)
- Cholesterol: ~150 mg
Why You’ll Love It
- Flavor & Texture: The dill pickle brine does two things—tenderizes the chicken and imparts a bright, savory tang; the Parmesan-breadcrumb crust adds crunchy saltiness and an irresistible toasty finish.
- Ease & Speed: A short brine (30 minutes) is all that’s needed to transform ordinary chicken breasts into something special; total active time is minimal.
- Crowd-Pleasing & Memorable: This recipe takes familiar elements—fried chicken, breadcrumbs, Parmesan—and gives them a playful twist that’s perfect for family dinners, potlucks, or game-day grazing.
How to Make Crispy Dill Pickle Parmesan Chicken
Ingredients
- 4 boneless, skinless chicken breasts (about 6 oz each)
- 1 cup dill pickle juice (from a jar of pickles)
- 1 cup seasoned breadcrumbs
- 1/2 cup grated Parmesan cheese
- 1/2 cup all-purpose flour
- 2 large eggs, whisked
- 1 teaspoon garlic powder
- 1 teaspoon onion powder
- 1/2 teaspoon paprika
- Salt and pepper, to taste
- Cooking oil, for frying (enough to make about 1/2 inch in skillet)
Optional ingredients and substitutions
- Gluten-free: Use gluten-free all-purpose flour and gluten-free breadcrumbs.
- Lower sodium: Use low-sodium pickle juice or dilute with water and use unsalted breadcrumbs; reduce added salt.
- Oven-fry: Bake at 425°F on a wire rack for 18–22 minutes, flipping once, to reduce oil use.
- Extra crisp: Add 1/4 cup crushed cornflakes or panko to the breadcrumb mix.
Preparation Steps
- Marinate: Place chicken breasts in a shallow dish or zip-top bag and pour in the dill pickle juice. Seal and refrigerate for 30 minutes to 2 hours. (Shorter time = less tang; longer time = more tender and tangy.)
- Prep dredging stations: Set up three shallow dishes:
- Dish A: Flour mixed with garlic powder, onion powder, paprika, salt & pepper.
- Dish B: Whisked eggs.
- Dish C: Parmesan mixed with breadcrumbs.
- Dry chicken: Remove chicken from the brine and pat dry thoroughly with paper towels. A dry surface helps the coating adhere and crisp.
- Bread the chicken: Dredge each piece first in the seasoned flour (shake off excess), then dip into the whisked eggs, then press into the breadcrumb-Parmesan mixture until well coated.
- Heat oil: Pour oil into a large skillet to about 1/2 inch depth. Heat over medium-high until shimmering and hot (about 350°F if using a thermometer). To test, drop a pinch of breadcrumb in—if it sizzles and browns, the oil is ready.
- Fry: Fry chicken 5–7 minutes per side, depending on thickness, until golden brown and cooked through (internal temperature 165°F). Don’t overcrowd the pan; work in batches if needed.
- Drain & rest: Transfer fried chicken to a wire rack set over a baking sheet to drain excess oil and keep crisp. Let rest 3–5 minutes before serving.
Practical tips
- Pat the chicken very dry before breading—moisture is the enemy of crispiness.
- Don’t over-flip—let one side form a crust before turning.
- Use a wire rack (not paper towels) to drain so the underside stays crisp.
- If you need to keep cooked pieces warm while frying the rest, place them in a 200°F oven on a wire rack.
Best Pairings
- Classic sides: Serve with coleslaw, crisp dill pickles, or a simple green salad for freshness.
- Comfort pairings: Mashed potatoes or fries soak up the tangy, cheesy crumbs.
- Sandwich version: Slice the chicken and tuck it into a toasted bun with shredded lettuce and a smear of ranch or spicy mayo for a crunchy sandwich—if you like chicken salad sandwiches, this recipe also parallels my recipe for dill pickle chicken salad sandwiches.
- Beverage: A cold lager or an iced tea with lemon balances the richness.
Storing Leftovers
- Room temperature: Serve within 2 hours if left out; do not store beyond that for food safety.
- Refrigerator: Store in an airtight container for up to 3–4 days. Re-crisp in a 400°F oven or air fryer for 5–8 minutes.
- Freezer: Freeze cooked, cooled pieces wrapped tightly for up to 2 months. Reheat from frozen in a 375°F oven until hot and crisp (about 15–20 minutes), or thaw overnight in the refrigerator first.
Chef’s Advice
- Use uniform chicken breasts so they cook evenly—pound thicker pieces to match the thinnest.
- Choose a neutral frying oil with a high smoke point (canola, vegetable, or light olive oil).
- For extra Parmesan flavor, mix 1–2 tablespoons of finely grated Parmesan into the flour step as well to build flavor layers.
- Temperature cue: If the crust is golden but the center still needs cooking, lower heat slightly and give a few extra minutes rather than over-browning the exterior.
Creative Twists
- Spicy Dill Pickle Parmesan: Add 1/2–1 teaspoon cayenne or a pinch of smoked paprika to the breadcrumb mix for heat and smokiness.
- Panko-Parmesan Crunch: Substitute panko for some or all of the breadcrumbs for an ultra-light, extra-crispy texture.
- Vegan/Plant-Based: Use firm tofu or thick seitan cutlets, marinate in pickle brine, dip in aquafaba (chickpea brine) as an egg substitute, and use vegan "Parmesan" and gluten-free panko.
- Oven-Baked Light Version: Toss the breaded chicken with a light spray of oil and bake on a wire rack at 425°F for 18–22 minutes, flipping once, for a lower-oil alternative reminiscent of my baked Caesar chicken with creamy Parmesan sauce style—see this method as inspiration at baked Caesar chicken with creamy Parmesan sauce.
Frequently Asked Questions
Q: Can I use store-bought pickle juice?
A: Yes. Store-bought brine works well—check sodium levels and adjust added salt in the flour mixture if needed.
Q: How long should I marinate the chicken?
A: 30 minutes gives a mild tang and tenderizing; up to 2 hours is great. Avoid marinating much longer or the chicken texture can become mushy from acid breakdown.
Q: My crust falls off—how do I fix that?
A: Ensure the chicken is patted dry, shake off excess flour before dipping in egg, and press the breadcrumb-Parmesan mix firmly onto the egg-coated surface. Let breaded pieces rest 5–10 minutes before frying to help adhesion.
Q: What’s the best way to reheat leftovers without sogginess?
A: Reheat in a 400°F oven or an air fryer for 5–8 minutes to restore crispness. Avoid microwaving unless you don’t mind losing crunch.
Q: Can I make this gluten-free?
A: Yes—use gluten-free flour and gluten-free breadcrumbs or crushed gluten-free cereal. Panko alternatives for gluten-free options also work well.
Conclusion
If you’re after something that balances crunchy comfort with a bright, tangy twist, this Crispy Dill Pickle Parmesan Chicken is a reliable, fun recipe to add to your rotation—easy enough for weeknights and distinctive enough for company. If you want to compare variations or inspiration from other cooks, check out this flavorful take on Dill Pickle Parmesan Chicken – I Am Homesteader, and for another version that blends tang and cheesy crunch, see the Dill Pickle Parmesan Chicken Recipe – Recipeothy.
Try it, share photos or notes, and let’s trade tips—there’s always one small tweak that turns a great recipe into your signature dish.
Printable Recipe Card
Want just the essential recipe details without scrolling through the article? Get our printable recipe card with just the ingredients and instructions.