Easy & Delicious Peanut Butter Rice Krispie Treats
Introduction
Close your eyes and imagine pulling a pan of warm, golden bars from the counter: the kitchen fills with the toasted aroma of peanut butter and the faint, sweet caramel scent of corn syrup and sugar. A bite delivers a satisfying contrast — crisp, airy Rice Krispies that give way to a chewy, peanut-butter-forward center and a glossy chocolate-butterscotch crown that snaps softly against the tongue. These squares are comfort food with a playful crunch, the kind of treat that sparks childhood smiles and grown-up indulgence alike.
This recipe is perfect for quick celebrations, school bake sales, holiday cookie trays, or when you need a fast, crowd-pleasing dessert. They’re also a brilliant last-minute dessert when friends drop by — and if you’re in a nostalgic mood, try a banana twist linked in our banana Rice Krispie treats for a fruity variation: banana Rice Krispie treats.
Dish Snapshot
- Prep Time: 10 minutes
- Cook Time: 10 minutes (plus melting chocolate)
- Total Time: 40 minutes (including cooling/hardening time)
- Servings: 12 bars (9×13 pan)
- Difficulty Level: Easy
Nutrition Highlights
Nutritional values are estimates calculated from ingredient amounts and standard food composition data (USDA FoodData Central). Values below are per serving (1 of 12). These are approximations and will vary by brand and exact measurements.
- Calories: ~500 kcal
- Protein: ~7–8 g
- Carbohydrates: ~70–75 g (of which sugars are a large portion)
- Fat: ~22–25 g
- Fiber: ~1.5–3 g
- Sodium: ~100–200 mg
Notes: This recipe is high in sugars and calories due to the sugar, corn syrup, peanut butter, and chips. For guidance on limiting added sugars and balancing treats in your diet, reputable resources include government nutrition guidance and health sites. Use the nutrition estimates to fit these into your overall meal plan.
Why You’ll Love It
- Flavor & Texture: The peanut butter backbone adds a rich, nutty depth while the corn-sugar base keeps the interior tender and chewy; the chocolate-butterscotch topping creates a decadent contrast.
- Ease & Speed: From pantry staples to finished bars in under an hour — no oven required.
- Social & Nostalgic: These are the kind of bars people remember from childhood potlucks, and they travel well for picnics, school events, or plate-sharing during the holidays.
Step-by-Step Instructions
Ingredients
- 1 cup granulated sugar
- 1 cup light corn syrup (Karo syrup)
- 1 cup creamy peanut butter (natural or regular, see substitutions below)
- 6 cups Rice Krispies cereal
- 1 1/2 cups semi-sweet chocolate chips
- 1 1/2 cups butterscotch chips
Optional ingredients and substitutions
- For extra chew: add 1 cup mini marshmallows while the mixture is warm.
- For crunch: fold in 1/2 cup chopped roasted peanuts.
- Gluten-free: use certified gluten-free crisp rice cereal.
- Vegan option: substitute peanut butter with almond butter or sunflower seed butter, replace corn syrup and sugar with a vegan syrup blend and vegan chocolate/butterscotch alternatives (see variations).
- Lower-sugar: reduce chocolate/butterscotch or use sugar-free chips (texture will differ).
Method & Process
- Prepare a 9×13-inch pan by lining with parchment or greasing it lightly. Have a greased spatula or large spoon ready.
- In a medium saucepan, combine 1 cup granulated sugar and 1 cup light corn syrup. Stir over medium heat until the mixture is bubbly and the sugar is fully dissolved (about 5–8 minutes). Watch closely to avoid burning; you want a steady simmer, not a hard boil.
- Remove the pan from heat immediately and stir in 1 cup peanut butter until smooth and fully incorporated.
- Quickly stir in 6 cups Rice Krispies cereal until every cereal piece is coated evenly. Avoid over-stirring which can crush the cereal and produce a dense bar.
- Spoon the rice krispie mixture into the prepared 9×13 pan. Use a greased spatula or greased hands to press the mixture firmly and evenly into the pan (press just enough to compact — over-pressing makes bars too dense).
- Place 1 1/2 cups semi-sweet chocolate chips and 1 1/2 cups butterscotch chips in a microwave-safe bowl. Microwave on high for 90 seconds, then stir thoroughly. Continue microwaving in 30-second intervals, stirring between each, until the chips are completely melted and glossy. Be careful — chips can scorch if overheated.
- Pour the melted chocolate-butterscotch mixture evenly over the pressed rice krispie layer. Smooth with a spatula to cover all bars. For a marbled look, swirl the two chips slightly before they set.
- Allow the bars to harden at room temperature on the counter. Do not refrigerate (refrigeration can cause the chocolate to bloom and the bars to become overly firm). Hardening typically takes 20–30 minutes depending on room temperature.
- Once the topping is set, slice into 12 even bars and serve.
Practical tips
- Work quickly when combining cereal and coating sauce — the mixture sets fast.
- Greasing your spatula/hands prevents sticking and avoids crushing the cereal when pressing.
- If your topping seizes in the microwave, add a teaspoon of vegetable oil and stir to restore gloss.
Best Pairings
- Plain and simple: serve as-is with a cold glass of milk—the classic companion.
- Coffee & tea: pair with medium roast coffee or black tea to balance sweetness.
- Ice cream sandwich: press a small scoop of vanilla ice cream between two slightly smaller bars for an indulgent treat.
- Party platter: cut into bite-size squares and pair with salted popcorn or fresh fruit to vary flavors.
Shelf Life & Storage
- Room temperature: Store in an airtight container at room temperature for 2–3 days for best texture. Keep layers separated with parchment to prevent sticking.
- Refrigeration: You can refrigerate for up to 5–7 days, but expect the bars to firm up and the chocolate topping to sometimes develop a slight bloom (it’s still safe to eat). Let come to room temperature before serving.
- Freezer: Wrap bars tightly in plastic wrap and store in a freezer-safe bag or container for up to 2 months. Thaw in the refrigerator or at room temperature before serving.
Pro Tips & Tricks
- Peanut butter choice matters: regular commercial peanut butter gives a creamy, stable texture; natural peanut butter (oil-separated) will add more robust peanut flavor but may make the bars slightly softer. If using natural, stir thoroughly and warm slightly to blend.
- Pressing technique: use a piece of parchment and a flat-bottomed measuring cup to press the mixture evenly without compacting too tightly.
- Topping shine: a teaspoon of neutral oil added to the melted chips will give a glossy finish.
- Avoid refrigeration right away: quick chilling can cause the chocolate to contract and form white streaks (fat bloom). Let set at room temperature for best appearance.
Creative Twists
- Salted Peanut Butter Crunch: Fold 1/2 cup crushed pretzels into the cereal mix and finish with a sprinkle of flaky sea salt on the melted topping.
- Peanut Butter-Chocolate Swirl: Melt chocolate and butterscotch separately and drizzle both in alternating lines; use a toothpick to create a decorative swirl pattern.
- Vegan & Allergy-Friendly: Use sunflower seed butter, a blend of maple syrup + coconut sugar (or a certified vegan corn syrup), gluten-free rice cereal, and vegan chocolate chips.
- Add fruit & nuts: press dried cranberries and chopped roasted peanuts into the topping before it sets for texture and color.
- If you want a chocolate-forward spin, see our related chocolate peanut butter version for inspiration: chocolate peanut butter treats.
All Your Questions Answered
Q: Can I substitute honey for the corn syrup?
A: Honey will work but will change texture and flavor slightly; the bars may be softer and darker in color. Use caution with heat, and expect a stronger flavor.
Q: My bars are too hard or too sticky — what went wrong?
A: Too hard often means the mixture was overcooked or over-pressed; too sticky means it was undercooked or needs a bit more time to set. Adjust heat/time next batch and press more gently.
Q: Can I make these smaller/different shapes?
A: Yes — press into a smaller pan for thicker bars or into a square pan and use cookie cutters once set for shapes.
Q: How can I reduce sugar?
A: Reduce the chocolate/butterscotch topping or swap for lower-sugar chips; use natural peanut butter without added sugar. Note that texture and sweetness will be affected.
Conclusion
These Peanut Butter Rice Krispie Treats are a fast, crowd-pleasing recipe that balances nostalgia with grown-up flavor through peanut butter and a chocolate-butterscotch finish. If you want more inspiration or alternate takes on cereal treats, check this classic version from The Country Cook for a similar peanut butter-focused approach: The Country Cook’s peanut butter Rice Krispies Treats. For detailed step photos and another variation, the HowToMakeCerealTreats guide is a helpful visual companion: peanut butter Rice Krispie treats recipe at HowToMakeCerealTreats.
Try the recipe, experiment with a twist, and share your photos and feedback — I love hearing how these bars find their way into your gatherings and memories.
Print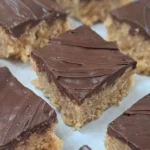
Easy & Delicious Peanut Butter Rice Krispie Treats
- Total Time: 40
- Yield: 12 bars 1x
- Diet: Vegetarian
Description
Deliciously chewy peanut butter Rice Krispie treats topped with a chocolate-butterscotch layer, perfect for quick celebrations and nostalgic cravings.
Ingredients
- 1 cup granulated sugar
- 1 cup light corn syrup (Karo syrup)
- 1 cup creamy peanut butter
- 6 cups Rice Krispies cereal
- 1 1/2 cups semi-sweet chocolate chips
- 1 1/2 cups butterscotch chips
Instructions
- Prepare a 9×13-inch pan by lining with parchment or lightly greasing it.
- In a medium saucepan, combine sugar and corn syrup over medium heat until bubbly and sugar is dissolved (about 5–8 minutes).
- Remove from heat and stir in peanut butter until smooth.
- Quickly stir in Rice Krispies until coated evenly.
- Spoon mixture into the prepared pan and press firmly to compact.
- Melt chocolate and butterscotch chips together in the microwave. Stir until glossy.
- Pour melted mixture over the Rice Krispie layer and smooth out.
- Allow to harden at room temperature (20–30 minutes).
- Slice into 12 bars and serve.
Notes
For extra chewiness, add mini marshmallows while warm. Can be stored in an airtight container for 2–3 days or refrigerated for up to 7 days.
- Prep Time: 10
- Cook Time: 10
- Category: Dessert
- Method: No-Bake
- Cuisine: American
Nutrition
- Serving Size: 1 bar
- Calories: 500
- Sugar: 30g
- Sodium: 150mg
- Fat: 23g
- Saturated Fat: 8g
- Unsaturated Fat: 15g
- Trans Fat: 0g
- Carbohydrates: 72g
- Fiber: 2g
- Protein: 8g
- Cholesterol: 0mg
Printable Recipe Card
Want just the essential recipe details without scrolling through the article? Get our printable recipe card with just the ingredients and instructions.