Introduction
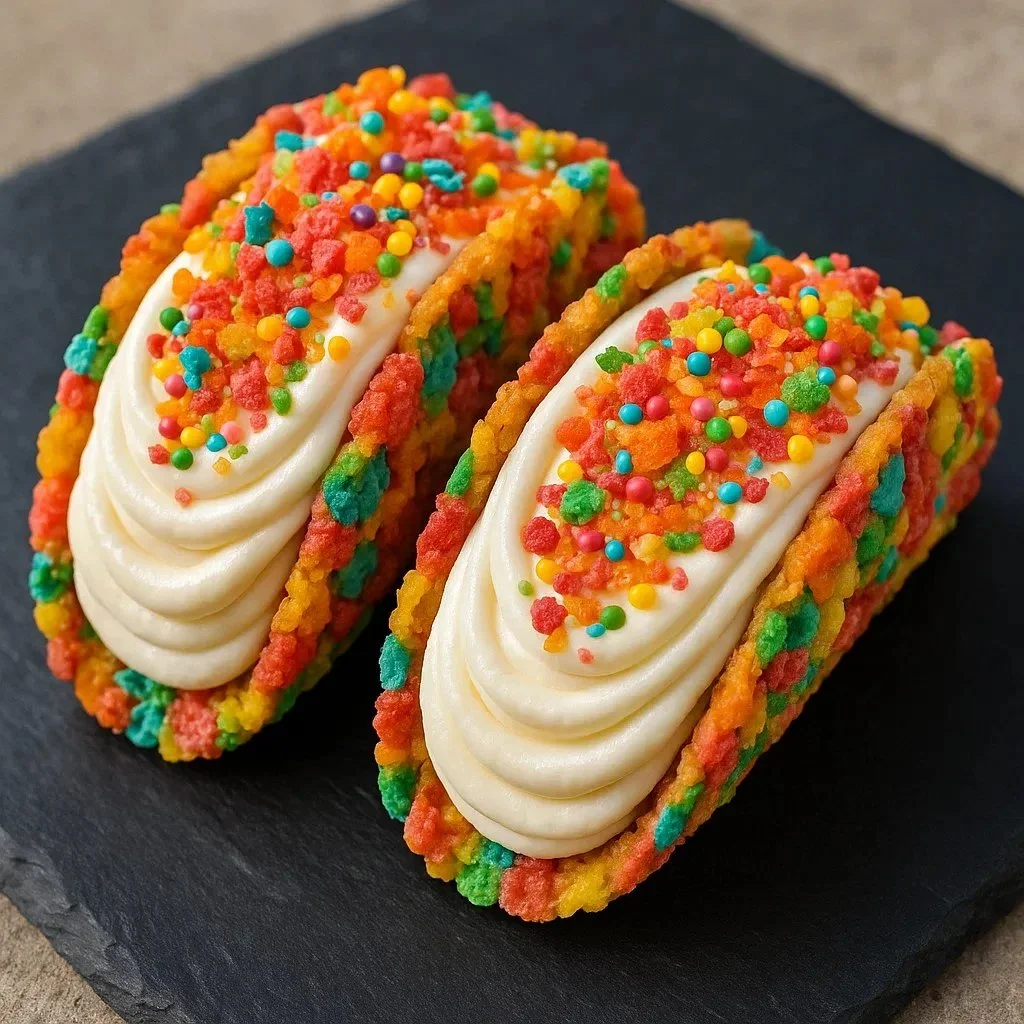
Close your eyes and imagine a crisp, rainbow-speckled shell that crackles gently under your fork, giving way to a silky, tangy-sweet cheesecake filling that melts on your tongue. Fruity Pebbles Cheesecake Tacos are exactly that—playful, nostalgic, and surprisingly elegant: the bright, crunchy cereal aroma mixed with the soft vanilla-and-cream tang of cheesecake creates a multisensory treat that delights kids and grown-ups alike. Each bite delivers contrast—crunch vs. cream, sugary pop vs. smooth richness—that sparks joy and a little weekday nostalgia.
These mini tacos are perfect for everything from a light, celebratory dessert at a weekend brunch to a festive addition for birthday parties, back-to-school gatherings, or a cozy movie night. They’re quick enough for last-minute hosting and special enough to make an ordinary afternoon feel like an occasion.
At a Glance
- Prep Time: 20 minutes (plus 30 minutes chilling time for shells)
- Cook Time: 0 minutes (no baking required)
- Total Time: 50 minutes (including chilling)
- Servings: Makes about 12 mini cheesecake tacos
- Difficulty Level: Easy — great for beginners and family projects
Nutritional Breakdown
Nutrition per serving (1 taco) — estimated:
- Calories: ~215 kcal
- Protein: ~1.7 g
- Total Carbohydrates: ~15 g
- Sugars: ~12 g
- Total Fat: ~17 g
- Saturated Fat: ~9 g
- Sodium: ~110 mg
- Fiber: ~0.3 g
Notes on these estimates:
- These values are estimates calculated from standard ingredient nutrient profiles (USDA FoodData Central and typical product labels) and will vary based on brands and exact measurements used (especially choice of whipped cream or topping). For individualized dietary needs or strict tracking, weigh your portions and check product labels or USDA FoodData Central entries for precise numbers. (Government nutrition databases such as the USDA FoodData Central are a trusted resource for ingredient-level nutrient data.)
Why You’ll Love It
There are a dozen reasons to fall for these tacos, but three stand out:
- Nostalgic, fun flavor: Fruity Pebbles provide that instantly recognizable childhood sweetness and color that make these tacos feel celebratory.
- Textural excitement: The crunchy cereal shells versus the airy, creamy filling create satisfying contrast in every bite.
- Easy party winner: No baking, minimal equipment, and big visual appeal—these are a go-to for parties, potlucks, or any time you want an approachable yet show-stopping dessert.
How to Make Fruity Pebbles Cheesecake Tacos
Ingredients
- 3 cups Fruity Pebbles cereal
- 1/2 cup unsalted butter, melted
- 8 oz cream cheese, softened to room temperature
- 1/2 cup powdered sugar, sifted
- 1 tsp pure vanilla extract
- 1 cup whipped cream (lightly whipped or stabilized, as preferred)
- Additional Fruity Pebbles cereal, for sprinkling / garnish
Optional ingredients & substitutions
- Vegan: Use vegan cream cheese, vegan butter, and a vegan whipped topping; choose a vegan/gluten-free colorful cereal.
- Lighter option: Replace half the cream cheese with Greek yogurt (strain well) or use light cream cheese and low-fat whipped topping.
- Flavor twists: Add 1–2 tsp lemon zest to the filling for brightness, or swap vanilla for almond extract (use sparingly).
Step-by-step Instructions
- Prepare the cereal crust: In a mixing bowl, combine 3 cups Fruity Pebbles cereal and 1/2 cup melted unsalted butter. Stir thoroughly until every piece is evenly coated. Tip: Work quickly so the butter coats evenly while still warm.
- Mold the taco shells: Press the cereal mixture firmly into small taco-shaped molds or into the curved side of a muffin tin or small taco molds. Compact tightly so the crust holds together. Tip: Use the back of a measuring spoon to press into curved shapes.
- Chill the shells: Place the filled molds in the refrigerator and chill for at least 30 minutes to firm up. This step is crucial for structural integrity.
- Make the cheesecake filling: Using a hand mixer, beat 8 oz softened cream cheese until light and fluffy (about 1–2 minutes). Gradually add 1/2 cup sifted powdered sugar and 1 tsp pure vanilla extract, blending until smooth. Scrape the bowl as needed to avoid lumps. Tip: Don’t overmix once sugar is incorporated—overbeating can make the filling too thin.
- Fold in whipped cream: Gently fold 1 cup whipped cream into the cream cheese mixture with a spatula, using light strokes to maintain a light, airy texture. Aim for a uniform, fluffy filling.
- Fill the shells: Once the cereal shells are firm, spoon or pipe the cheesecake filling into each shell generously. Fill to the edges for a satisfying bite.
- Finish and serve: Sprinkle additional Fruity Pebbles cereal over the filled shells for color and crunch. Serve immediately for maximum crunch, or chill the filled tacos for 15–30 minutes for a firmer, sliceable texture.
Practical tips:
- If shells are fragile, chill longer before removing from molds.
- Avoid overwhipping the cream cheese — you want a stable, airy filling, not runny.
- If making ahead, assemble shells and filling separately; fill just before serving for best texture.
Serving Suggestions
- Serve plain as colorful handheld desserts at parties.
- Plate with a small drizzle of chocolate or caramel sauce for an indulgent variation.
- Pair with coffee or a light fruit tea for brunch.
- Offer a scoop of vanilla ice cream alongside for an extra-special dessert plate.
- For kids’ lunches or snack boxes, pack one taco in a small container with a napkin—an easy treat.
Storage Instructions
- Room temperature: Not recommended; because of the cream cheese and whipped components, the assembled tacos should not sit at room temperature for more than 2 hours.
- Refrigeration: Store assembled tacos in an airtight container in the refrigerator for up to 2–3 days. Note that the cereal shells will soften over time from moisture in the filling; for crunchier shells, store shells and filling separately and assemble before serving.
- Freezer: The shells can be frozen for up to 1 month if wrapped tightly; thaw in the refrigerator before filling. The assembled tacos aren’t ideal for freezing due to texture changes in whipped components.
Insider Secrets
- Best cereal-to-butter ratio: The 3 cups cereal to 1/2 cup butter ratio gives a shell that’s crisp but moldable—don’t skimp on butter or shells will crumble.
- Chill for structure: The refrigeration step is the key to keeping shells intact—if you skip chilling, the shells will be fragile and fall apart when filled.
- Stabilize the filling: If you need the cheesecake filling to hold up for longer (for a dessert table), stabilize whipped cream with a bit of powdered gelatin or use a whipped topping that’s designed to keep its texture.
- Use room-temperature cream cheese: It blends smoother and prevents lumps; if your cream cheese is too cold, it will clump.
Delicious Variations
- Vegan & Gluten-Free: Substitute vegan butter, vegan cream cheese, and a certified gluten-free fruity cereal to make these allergy-friendly. Use a nondairy whipped topping to finish.
- Lemon-Berry Cheesecake Tacos: Add 1 tsp lemon zest and 1–2 tbsp lemon juice to the filling, top with a few fresh berries and a sprinkle of cereal for a brighter, fruit-forward version.
- Chocolate-Mint Twist: Mix 2 tbsp cocoa powder into the filling and use chocolate cereal pieces for the crust; garnish with crushed Andes mints or mint leaves.
- Peanut Butter Lovers: Swirl 2 tbsp smooth peanut butter into the filling (or mix with a small portion of the cream cheese before folding in whipped cream) and top with mini chocolate chips.
Frequently Asked Questions
Q: Can I make the cereal shells ahead of time?
A: Yes—press them into molds and chill or freeze them. Refrigerated shells will hold for a couple of days; frozen shells keep for up to a month. Thaw in the fridge before filling.
Q: My filling is too runny—what went wrong?
A: Likely overwhipped cream or under-chilled cream cheese. Chill the mixture briefly and fold in a little more whipped cream that’s slightly firmer, or add a small amount of sifted powdered sugar to stabilize.
Q: Can I use flavored cream cheese or a different sweetener?
A: Yes. Flavored cream cheese (strawberry, citrus) can add dimension; swap powdered sugar for a sugar substitute but note texture and sweetness will change.
Q: How do I keep shells crunchy after filling?
A: Fill just before serving. For parties, store shells and filling separately and assemble on-site.
Conclusion
If you love desserts that look festive, taste indulgent, and are surprisingly simple to make, these Fruity Pebbles Cheesecake Tacos are a must-try—perfect for parties, family gatherings, or a weekday treat that lights up everyone’s faces. For inspiration and a no-bake perspective on a related Fruity Pebbles cheesecake, check out this recipe: Fruity Pebbles Cheesecake (No-Bake) – Kitchen Fun With My 3 Sons. If you want to see another take on the taco presentation and filling ideas, this recipe is a helpful reference: Fruity Pebbles Tacos with Cheesecake Filing – My Homemade Recipe.
Give this recipe a try, share your colorful creations in the comments, and tag your photos—let’s build a playful dessert community around bright flavors and simple techniques.
Print
Fruity Pebbles Cheesecake Tacos
- Total Time: 50 minutes
- Yield: 12 mini tacos 1x
- Diet: Vegetarian
Description
Delicious mini tacos with a crunchy Fruity Pebbles crust filled with creamy cheesecake, perfect for parties and nostalgic treats.
Ingredients
- 3 cups Fruity Pebbles cereal
- 1/2 cup unsalted butter, melted
- 8 oz cream cheese, softened to room temperature
- 1/2 cup powdered sugar, sifted
- 1 tsp pure vanilla extract
- 1 cup whipped cream
- Additional Fruity Pebbles cereal, for garnish
Instructions
- In a mixing bowl, combine Fruity Pebbles and melted butter, mixing until coated.
- Press the mixture firmly into taco-shaped molds or muffin tin sides.
- Chill the molds in the refrigerator for at least 30 minutes.
- Beat cream cheese until fluffy, then mix in powdered sugar and vanilla.
- Fold in whipped cream gently.
- Once the shells are firm, fill them with the cheesecake mixture.
- Garnish with additional Fruity Pebbles and serve immediately or chill slightly before serving.
Notes
For best texture, fill tacos just before serving. Store shells and filling separately if making ahead.
- Prep Time: 20 minutes
- Cook Time: 0 minutes
- Category: Dessert
- Method: No-Bake
- Cuisine: American
Nutrition
- Serving Size: 1 taco
- Calories: 215
- Sugar: 12g
- Sodium: 110mg
- Fat: 17g
- Saturated Fat: 9g
- Unsaturated Fat: 8g
- Trans Fat: 0g
- Carbohydrates: 15g
- Fiber: 0.3g
- Protein: 1.7g
- Cholesterol: 30mg
Printable Recipe Card
Want just the essential recipe details without scrolling through the article? Get our printable recipe card with just the ingredients and instructions.