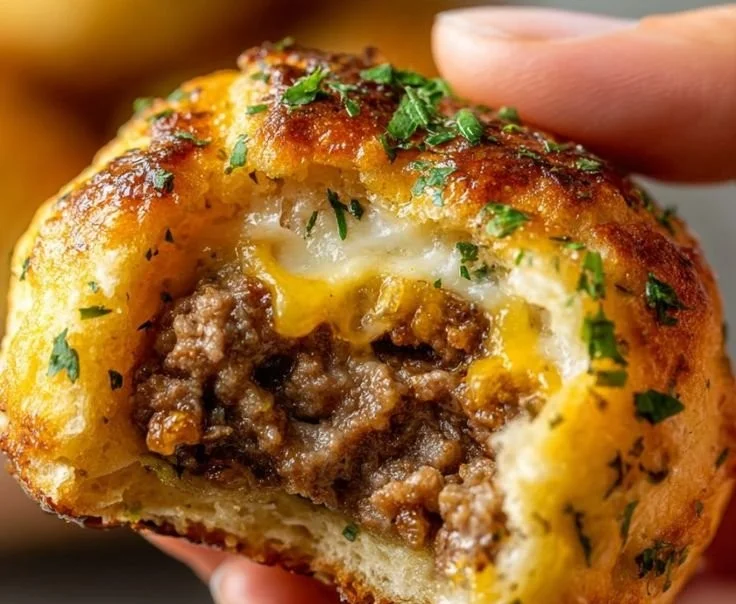
Garlic Parmesan Cheeseburger Balls
There’s a moment when the oven opens and a wave of warm, garlicky cheese fills the kitchen — that’s the magic of these Garlic Parmesan Cheeseburger Balls. Imagine a crispy-golden exterior giving way to a juicy, beefy center threaded with melted cheddar and the bright, umami lift of Parmesan and Worcestershire. The aroma is mouthwatering: roasted garlic, browned beef, and toasted cheese. The first bite is textural contrast — slightly crisp edges, tender meat, gooey cheese — and it hits comforting, savory, and a little indulgent all at once.
These little bites are perfect for gatherings when you want something both familiar and a little playful: casual game nights, potlucks, or holiday appetizer spreads. They also work as a cozy weeknight treat when you want a fast, satisfying meal that feels special. If you love garlic-parmesan flavors in other forms, you might enjoy pairing them with an air-fryer garlic parmesan fries side for a crunchy, seasoned companion.
At a Glance
- Prep Time: 15 minutes
- Cook Time: 20–25 minutes
- Total Time: 35–40 minutes
- Servings: 6 (about 3–4 balls per person, depending on size)
- Difficulty Level: Easy — great for beginner cooks
Nutrition Highlights
Nutrition per serving (estimate — recipe yields 6 servings)
- Calories: ~360 kcal
- Protein: ~23 g
- Carbohydrates: ~8 g
- Fat: ~25 g
- Fiber: ~1 g
- Sodium: variable (depends heavily on cheeses and Worcestershire)
Notes on accuracy: these values are approximate and calculated from standard ingredient databases (USDA FoodData Central) and typical product labels. For guidance on how this fits into a balanced diet, reputable sources such as the USDA and the Mayo Clinic are recommended references. Sodium can be high due to cheeses — adjust by choosing lower-sodium options or reducing added salt.
Why You’ll Love It
- Irresistible aroma and flavor: Roasted garlic and Parmesan give a fragrant, sophisticated tang that elevates familiar cheeseburger flavors.
- Crowd-pleasing nostalgia: They capture the cheeseburger in a snackable form — nostalgic and fun for kids and adults.
- Speed and simplicity: Minimal ingredients and one-bake cleanup make them perfect for quick entertaining or an easy family dinner.
- Versatility: Serve them as appetizers, finger food, or pile them over a salad for a hearty twist.
How to Make Garlic Parmesan Cheeseburger Balls
Ingredients
- 1 lb (454 g) ground beef (80–85% lean recommended)
- 1 cup (approx. 113 g) shredded cheddar cheese
- 1/2 cup (approx. 50 g) grated Parmesan cheese
- 2 cloves garlic, minced
- 1/2 cup (approx. 60 g) breadcrumbs (plain or panko)
- 1 large egg
- Salt and freshly ground black pepper, to taste
- 1 tbsp Worcestershire sauce
Optional ingredients and substitutions
- Swap ground turkey or chicken for a lighter version (may need an extra tablespoon of oil or cheese to maintain juiciness).
- Use gluten-free breadcrumbs or crushed gluten-free crackers to make the recipe gluten-free.
- Add 1–2 tbsp finely chopped fresh parsley or chives for a herb-forward note.
- For extra heat, fold in 1/4 tsp crushed red pepper flakes or finely diced jalapeño.
- Use low-sodium cheeses to reduce overall sodium.
Step-by-step instructions
- Preheat the oven to 375°F (190°C). Line a baking sheet with parchment paper or lightly grease it.
- In a large bowl, combine the ground beef, shredded cheddar, grated Parmesan, minced garlic, breadcrumbs, egg, Worcestershire sauce, salt (start light), and pepper. Mix gently until ingredients are just combined.
- Shape the mixture into small balls (about 1 to 1½ inches in diameter). Place them evenly on the prepared baking sheet.
- Bake for 20–25 minutes, or until they are golden brown on the outside and reach an internal temperature of 160°F (71°C) for ground beef. If you like a more browned exterior, broil for 1–2 minutes at the end while watching carefully.
- Remove from the oven, let rest for 3–5 minutes, then serve warm.
Practical tips
- Avoid overmixing: Overworking the meat will create dense, tough balls. Mix just until combined.
- Size consistency: Use a small cookie scoop for uniform balls to ensure even cooking.
- Check doneness: Use an instant-read thermometer to confirm 160°F (71°C) for beef; this is the safest way to ensure doneness without drying them out.
- If mixture feels too wet, add a tablespoon of breadcrumbs at a time until it holds; if too dry, a splash of milk or an extra egg yolk will help.
Presentation Tips
- Serve on a platter with toothpicks and small bowls of dipping sauces: ketchup, mustard, garlic aioli, or a tangy BBQ sauce.
- For a party spread, nestle them on a bed of arugula or mixed greens and drizzle with a little olive oil and lemon for brightness.
- Make sliders: place one cheeseburger ball in a mini bun, add pickles, and a dollop of special sauce for a playful bite.
- For breakfast or brunch, serve alongside eggs and toast for a savory, protein-rich twist. You can also pair them with an additional garlic-parmesan side like air-fryer garlic parmesan fries for a cohesive flavor profile.
Storing Leftovers
- Room temperature: Do not leave perishable meat-based dishes at room temperature for more than 2 hours.
- Refrigeration: Store in an airtight container for up to 3–4 days. Reheat in a 350°F (175°C) oven for about 8–10 minutes to preserve texture, or microwave in short bursts if pressed for time.
- Freezer: Freeze cooked cheeseburger balls in a single layer on a sheet pan until firm, then transfer to a freezer bag or container for up to 3 months. Reheat from frozen in a 375°F (190°C) oven for 20–25 minutes or until heated through.
Chef’s Advice
- Balance the binders: Too many breadcrumbs will dry them out; too few will make them fall apart. Start with the stated amount and adjust by feel.
- Cheese distribution: Toss the shredded cheddar and grated Parmesan in with the meat just enough to disperse; pockets of cheese are delightful but you don’t want it to all pool in the center.
- Browning trick: If you like a crisper exterior, sear the balls briefly in a hot skillet (1–2 minutes per side) before transferring to the oven — just don’t overcook the interior.
- Flavor layering: Toast the minced garlic briefly in a dry pan to mellow its bite before mixing if you want a subtler garlic note.
Creative Twists
- Italian-style: Add 1 tsp Italian seasoning, swap Worcestershire for a splash of balsamic, and serve with marinara for dipping.
- Bacon & chive: Fold in 2 slices cooked and crumbled bacon and 1–2 tbsp chopped chives; reduce salt slightly.
- Veg-forward (lighter): Replace half the ground beef with finely chopped, sautéed mushrooms for added umami and lower overall fat.
- Spicy pepper jack: Use shredded pepper jack instead of cheddar and add 1/4 tsp smoked paprika for a smoky kick.
- Vegan alternative: Use a plant-based ground meat substitute, vegan cheddar, a flax “egg” (1 tbsp ground flax + 3 tbsp water), and gluten-free breadcrumbs. Adjust cook time per the plant-based product instructions.
Frequently Asked Questions
Q: Can I make these ahead of time?
A: Yes — shape the balls and refrigerate on a tray for up to 24 hours before baking, or freeze raw on a tray then transfer to a bag for longer storage.
Q: My mixture is falling apart — what went wrong?
A: It likely needs a binder (more breadcrumbs or an extra egg) or the mixture was too cold. Add a tablespoon of breadcrumbs at a time and chill 10–15 minutes before shaping.
Q: How can I make them leaner or healthier?
A: Use lean ground turkey or a 93% lean beef and reduce the cheese amount slightly. Adding grated vegetables (zucchini or mushrooms, well-drained) can also stretch the meat and lower fat per serving.
Q: What’s the best way to reheat so they stay tender?
A: Reheat in a preheated oven at 350°F (175°C) for 8–12 minutes rather than microwaving, which can make them rubbery.
Q: Can I cook these on the stovetop or in an air fryer?
A: Yes — sear briefly in a skillet then finish in the oven, or cook in an air fryer at 370°F (188°C) for about 10–12 minutes depending on size, shaking halfway.
Conclusion
If you’re after a snack that’s nostalgic but upgraded, these Garlic Parmesan Cheeseburger Balls deliver comforting cheeseburger flavor in a hand-held package — perfect for gatherings, cozy meals, or meal prep. Try them with sauces and sides you love, share your tweaks, and tag along with the community to swap ideas and photos. For another take on garlic-parmesan perfection, check out this community-tested version of Garlic Parmesan Cheeseburger Bombs – Pitmaster Club, and for a home-cook’s perspective with step-by-step photos see Garlic Parmesan Cheeseburger Bombs – I’m Hungry For That.
Happy cooking — I can’t wait to hear how your batch turns out!
Printable Recipe Card
Want just the essential recipe details without scrolling through the article? Get our printable recipe card with just the ingredients and instructions.