
Glazed Apple Slab Pie
Introduction
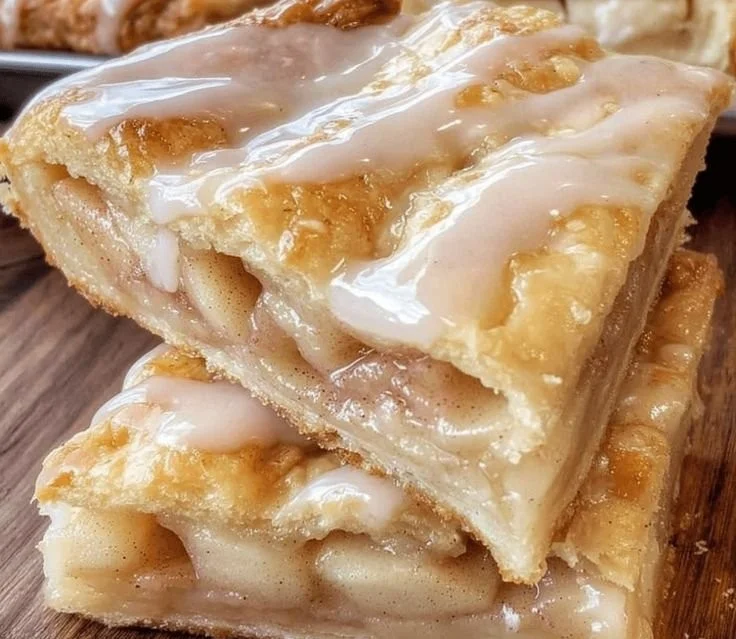
There’s a moment when the oven door opens and a warm cloud of caramelized apple aroma spills into the kitchen — that’s the scent of home, of holiday mornings and slow Sunday afternoons. This Glazed Apple Slab Pie is all about that moment: a golden, flaky crust that gives way to tender, cinnamon-kissed apple slices and a glossy sweet glaze that crackles gently when you slice through it. Each bite delivers a comforting contrast of crisp edge, soft fruit, and a sugary finish that feels both nostalgic and celebratory.
This recipe is ideal for feeding a crowd without fuss — perfect for potlucks, brunches, or a festive dessert that can be made ahead and taken out right before guests arrive. If you like the idea of sharing pie in different formats, you might enjoy trying smaller, single-serve variations like these apple pie cupcakes for parties and casual gatherings: apple pie cupcakes.
At a Glance
- Prep Time: 20 minutes active + 30 minutes chilling
- Cook Time: 25–30 minutes
- Total Time: 1 hour (including chill)
- Servings: 12 (large slab slices)
- Difficulty Level: Easy–Intermediate
Nutrition Highlights
Estimated nutrition per serving (1 of 12):
- Calories: ~370 kcal
- Protein: ~2.5 g
- Carbohydrates: ~54 g
- of which sugars (including added): ~29 g
- Dietary fiber: ~1.6 g
- Fat: ~16 g
- Sodium: ~150 mg
Notes on accuracy: These estimates were calculated using ingredient standard values from USDA FoodData Central and checked against general guidance from the CDC for macronutrient conversions (4 kcal/g protein and carbs; 9 kcal/g fat). Because fruit size, exact packing of sugars, type of butter, and other small variables change totals, treat these as reasonable estimates rather than laboratory-precise values.
Why You’ll Love It
This slab pie hits several pleasures at once:
- Irresistible aroma and mouthfeel: warm apples, cinnamon, and brown sugar create a cozy, comforting fragrance and a soft, juicy filling that contrasts with a tender, buttery crust.
- Crowd-pleasing simplicity: it’s large-format, so you spend less time making multiple individual pies and more time enjoying company.
- Versatile: serve it for breakfast, as an after-dinner dessert, or at a holiday table.
- Nostalgia and celebration: it evokes family gatherings and seasonal traditions while staying simple enough to make any weeknight feel special.
Step-by-Step Instructions
Ingredients
- 2 cups (240 g) all-purpose flour
- 1 cup (226 g) unsalted butter, softened (cold butter can be used for a flakier crust)
- 1/2 cup (100 g) granulated sugar
- 1/4 teaspoon salt
- 4–5 large apples (about 800–900 g peeled and sliced) — Granny Smith, Honeycrisp, or a mix
- 1 cup (220 g) packed brown sugar
- 1 teaspoon ground cinnamon
- 1/4 teaspoon ground nutmeg
- 1 tablespoon fresh lemon juice
- 1/4 cup (30 g) icing (powdered) sugar
- 2 tablespoons milk (plus extra for brushing, optional)
Optional ingredients and substitutions
- Use 1/2 cup (120 g) unsweetened applesauce to reduce added sugar (lower sweetener proportionally).
- For a vegan version: substitute butter with cold coconut oil or a vegan butter spread; use plant-based milk.
- Gluten-free: swap all-purpose flour for a 1:1 gluten-free baking flour blend (baking performance varies).
- Add 1/2 cup chopped toasted pecans or walnuts for crunch.
- Swap 1/4 cup brown sugar for maple syrup (reduce other liquid slightly) to add depth.
Directions
- Preheat the oven to 375°F (190°C). Lightly grease a sheet pan (approx. 13 x 18 inches) or line with parchment.
- In a bowl, combine the flour, softened butter, granulated sugar, and salt. Using a pastry blender, fork, or food processor, mix until the mixture forms a coarse dough with pea-sized butter pieces. Don’t overwork — you want bits of butter to create flakiness.
- Divide the dough into two portions. Flatten each into a disk, wrap, and chill in the refrigerator for 30 minutes.
- While dough chills, peel and slice the apples. In a large bowl, toss apple slices with the brown sugar, cinnamon, nutmeg, and lemon juice so everything is evenly coated.
- Roll out one dough disk on a lightly floured surface to roughly fit your sheet pan. Transfer to the pan and press to cover the bottom and sides slightly.
- Pour the apple mixture evenly over the crust in the pan, spreading to the edges but leaving a small rim.
- Roll out the second dough disk and carefully place it over the apples. Pinch the edges to seal; trim any excess. Optional: make a few steam vents or a lattice pattern for steam release and a decorative finish.
- Optional: brush the top crust with a thin layer of milk for sheen and a sprinkle of sugar if desired.
- Bake for 25–30 minutes, or until the crust is golden brown and the filling is bubbling through vents.
- Remove from the oven and allow to cool on a rack for at least 20–30 minutes to let the filling set.
- In a small bowl, whisk the icing sugar with the milk until smooth to make a glaze. Drizzle over the cooled pie, then slice into 12 squares to serve.
Practical tips
- Avoid overmixing dough to keep it tender and flaky.
- If using very juicy apples, toss them with 1–2 tablespoons of flour or cornstarch to prevent a runny filling.
- Check doneness by lifting a corner of the top crust to see if the filling is bubbling — bubbling indicates the apples have released juices and thickened.
- For easier serving, chill the pie slightly (10–15 minutes) to let slices hold their shape.
(For guidance on making a classic deep-dish apple pie and lattice tops, you may find this recipe helpful as a reference: apple pie from scratch.)
Best Pairings
- Classic: Serve warm with a scoop of vanilla ice cream (the cold cream melts into the warm apples).
- Cozy breakfast: Reheat a slice and eat with butter and a strong cup of coffee or chai tea.
- Afternoon treat: Pair with black tea or a lightly spiced latte to complement the cinnamon notes.
- Boozy option: A glass of warm mulled cider or a semi-dry Riesling balances the pie’s sweetness.
- Presentation tip: Finish with a dusting of cinnamon or a few thin apple slices arranged on top of the glaze for visual appeal.
Storage Instructions
- Room temperature: Cover loosely with foil or a pie keeper and store for up to 2 days.
- Refrigeration: Store in an airtight container or wrapped tightly for up to 5 days. Reheat in a 325°F (160°C) oven for 8–10 minutes to refresh crust crispness.
- Freezer: Wrap tightly in plastic wrap and foil (or freeze slices in a freezer-safe container) for up to 2 months. Thaw overnight in the refrigerator and reheat in a warm oven before serving.
Pro Tips & Tricks
- Best apple varieties: Use a mix of tart and sweet apples (Granny Smith + Honeycrisp or Jonagold) to achieve balance in flavor and texture.
- Texture key: Slice apples uniformly (1/8–1/4 inch) so they cook evenly — thicker slices remain pleasantly toothsome.
- Crust technique: For flakier crust, keep butter cold and handle dough minimally; chill the dough before rolling.
- Doneness cues: Look for golden-brown crust and bubbling filling at vents; if edges brown too quickly, tent with foil.
- Glaze balance: Make your glaze slightly thinner than you think — it will set as it cools and creates a beautiful sheen without being cloying.
Fun Flavor Ideas
- Caramel Apple Slab: Stir 1/2 cup caramel sauce into the apple mixture and drizzle more caramel over the glaze.
- Maple-Pecan Twist: Replace half the brown sugar with pure maple syrup and sprinkle 1/2 cup toasted pecans over the apples.
- Spiced Pear & Apple: Swap two apples for pears and add 1/2 teaspoon ground ginger for a more complex spice profile.
- Vegan option: Use chilled coconut oil or vegan butter and a plant-based milk for the glaze; reduce sugar slightly if using naturally sweeter apple varieties.
- Gluten-free: Use a cup-for-cup gluten-free flour blend and add 1 teaspoon xanthan gum if your blend lacks binders.
Recipe Q&A
Q1: Can I make the dough ahead of time?
A1: Yes — you can make and chill the dough up to 2 days in advance or freeze it for up to 1 month. Thaw overnight in the fridge before rolling.
Q2: My filling is watery — how do I fix it?
A2: Toss apple slices with 1–2 tablespoons cornstarch or flour before assembling; ensure apples are well-coated and bake until filling bubbles to activate thickener.
Q3: Can I halve or double this recipe?
A3: Yes — scale ingredients proportionally. For a smaller pie, use a 9×13-inch pan and adjust baking time (you may need slightly longer).
Q4: How can I reduce sugar without losing flavor?
A4: Use a mix of tart apples, reduce brown/granulated sugar by 1/4–1/3, and brighten with extra lemon juice or a teaspoon of vanilla extract.
Q5: Will this work with frozen apples?
A5: Fresh is best for texture. If using frozen, thaw and drain excess liquid, then toss with a thickener such as 2–3 tablespoons of cornstarch.
Conclusion
If you’re looking for a show-stopping yet approachable dessert that captures the warmth of apple season and the satisfaction of homemade baking, this Glazed Apple Slab Pie is a wonderful choice. For inspiration and variations from other home bakers who specialize in slab pies, you can compare styles and techniques at Apple Slab Pie – The Country Cook and Apple Slab Pie – Smells Like Home. Try the pie, tweak it to your taste, and if you make it, please share your photos and feedback — I love seeing your kitchen wins and adaptations.
Printable Recipe Card
Want just the essential recipe details without scrolling through the article? Get our printable recipe card with just the ingredients and instructions.


