Homemade Bread
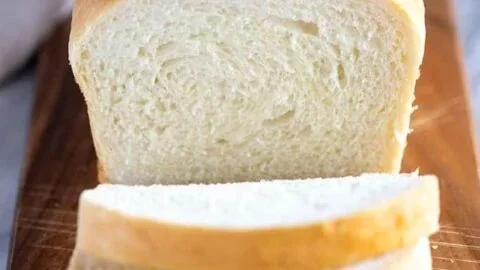
There’s something almost impossibly comforting about the smell of bread baking: warm, yeasty sweetness that drifts through the house and invites everyone to the kitchen. The crust blisters into a golden brown while the crumb stays tender and springy — a soft, slightly chewy interior that yields thin wisps of steam when sliced. This recipe produces two classic loaves that are perfect for slathering with butter, tearing into during weekend breakfasts, or building hearty sandwiches for weekday lunches.
Make a batch on a quiet morning and you’ll feel the day slow down; bake it for guests and watch people gravitate toward the counter. If you like soft flatbreads too, try this recipe’s structure with a different shape—I often adapt the dough for a quick naan-style bread when dinner needs a spritely side (see my favorite reference to a soft naan recipe). This loaf is equally at home during cozy winter breakfasts, family gatherings, or as the foundation for an everyday sandwich.
At a Glance
- Prep Time: 20 minutes active (plus rises)
- Cook Time: 30–33 minutes
- Total Time: ~2 hours 45 minutes (including rises)
- Servings: about 16 slices (two 9×5" loaves; 8 slices per loaf)
- Difficulty Level: Easy — great for first-time bread bakers
Nutrition Highlights
Nutritional values below are estimated per slice (1 of 16) using standard ingredient measures and USDA FoodData Central values for all-purpose flour, honey, and vegetable oil. Values will change if you alter flour amount, swap honey for sugar, or add extras.
Per serving (1 slice, recipe makes ~16):
- Calories: ~174 kcal
- Protein: ~4.0 g
- Carbohydrates: ~34.2 g
- Sugars: ~4.4 g (from honey)
- Fiber: ~1.1 g
- Fat: ~2.1 g
- Sodium: depends on salt added — about 150–200 mg per slice (based on 2 tsp salt in recipe)
Notes on accuracy: these estimates were calculated from USDA nutritional data for the principal ingredients and rounded for readability. For personalized dietary advice or strict tracking, consult a registered dietitian or check exact ingredient labels and portion sizes (sources used: USDA FoodData Central and general guidance from government health resources).
Why You’ll Love It
- Aroma & Taste: The first slice radiates that warm, slightly sweet aroma that only freshly baked bread can deliver; honey (or sugar) provides a gentle sweetness that rounds the flavor without making it dessert-like.
- Comfort & Connection: This recipe is the kind you remember later for the small domestic rituals — kneading with your hands, pressing down the dough, brushing butter on the crust. It’s an approachable recipe to make with kids or to bring to potlucks.
- Reliability & Versatility: It’s forgiving. The dough tolerates slight variances in flour amount and can be shaped into loaves, rolls, or even a flat round for sandwiches and paninis.
- Practical: Two loaves mean one for now and one to freeze, so you can enjoy homemade bread across a week without daily baking.
Preparation Guide
Ingredients
- 2 cups warm water (105–115°F / 40–46°C) (474 g)
- 1 Tablespoon active dry yeast
- 1/4 cup honey (about 85 g) — OR 1/4 cup granulated sugar (about 50 g) if you prefer
- 2 teaspoons salt (about 12 g)
- 2 Tablespoons oil (canola or vegetable) (about 30 ml)
- 4 – 5 1/2 cups all-purpose or bread flour (500–688 g). For this post’s calculations use 5 cups (about 625 g)
- Optional: 1 egg for an egg wash (for shinier crust), 1–2 Tablespoons melted butter for brushing
Optional ingredients and substitutions
- To make the recipe vegan: use sugar instead of honey (if your sugar isn’t bone-char processed), and omit egg wash.
- For a richer loaf: replace 1–2 tablespoons of oil with melted butter.
- Whole wheat blend: substitute up to 25–30% whole wheat flour (expect denser crumb; add a touch more water).
- For rolls: divide dough into 12–16 pieces and shorten second rise to 30–40 minutes.
Step-by-step Directions
- Prepare the dough: In a large bowl or stand mixer add the yeast, warm water, and a pinch of the sugar or honey. Allow to rest 5–10 minutes until foamy and bubbly. (This is proofing the yeast — if it doesn’t foam, start over with fresh yeast.)
- Add remaining sugar or honey, salt, oil, and 3 cups of flour. Mix to combine.
- Add another cup of flour and mix to combine. With the mixer running, add more flour ½ cup at a time until the dough begins to pull away from the sides of the bowl. The dough should be smooth and elastic, slightly sticky to a clean finger but not overly wet. Add a little more flour if needed.
- Knead the dough: Mix for 4–5 minutes on medium speed (or knead by hand on a lightly floured surface for 5–8 minutes) until smooth and elastic.
- First Rise: Grease a large bowl with oil or cooking spray and place the dough inside, turning to coat. Cover with a dish towel or plastic wrap and allow to rise in a warm place until doubled in size, about 1 1/2 hours.
- Prepare pans: Spray two 9×5" bread pans generously with cooking spray on all sides. Optionally line the bottom of each pan with a piece of parchment paper.
- Shape loaves: Punch the dough down to release air bubbles. Divide into two equal portions. Shape each portion into a log and place into greased loaf pans.
- Second Rise: Cover the pans with a lightweight, dry dish towel or spray two pieces of plastic wrap with cooking spray and lay over the pans. Allow dough to rise again for about 45–60 minutes, or until risen about 1 inch above the pans.
- Bake: Preheat oven to 350°F (175°C). Bake loaves for 30–33 minutes, or until golden brown. Tap the top of a loaf gently — it should sound hollow.
- Cool & finish: Invert loaves onto a wire rack. Brush tops with melted butter if desired and allow to cool at least 10 minutes before slicing.
- Storage: Once cooled, store in an airtight container at room temperature for up to 2–3 days, or refrigerate up to 5 days (see full storage guidance below).
Practical tips
- Avoid overmixing/overkneading; you want elastic gluten but not a tough loaf.
- If the dough becomes too sticky while kneading, add flour a tablespoon at a time — the dough should be tacky, not gluey.
- Oven temperatures vary — the hollow sound when tapped and a deep golden top are reliable doneness cues.
- To speed things up slightly, proof in a warm (but not hot) oven set to 100°F with the light on.
(For a grain-free or paleo-style adaptation, consider techniques and ingredient swaps similar to those described in this paleo bread alternative.)
Best Pairings
- Classic: Thick slices with salted butter and a cup of hot coffee or tea for a cozy breakfast.
- Sandwiches: Use as the base for club sandwiches, BLTs, or grilled cheese — sturdy but tender enough to fold around fillings.
- Toasted: Lightly toasted and topped with smashed avocado, a sprinkle of flaky sea salt, and chili flakes.
- Soups & Stews: Serve alongside tomato soup, beef stew, or chili to sop up broths and sauces.
- Sweet: Spread with jam or honey and a smear of cream cheese for brunch or snacks.
Keeping it Fresh
- Room temperature: Store in an airtight bag or bread box for 2–3 days.
- Refrigerator: Keeps up to 5 days but may stale faster; reheat slices briefly in the toaster or oven to refresh texture.
- Freezer: Wrap loaves tightly in plastic wrap and then foil; freeze up to 3 months. Thaw at room temperature or slice and toast from frozen.
Chef’s Advice
- Flour choice matters: Bread flour gives a slightly chewier, taller loaf due to higher protein; all-purpose yields a tender crumb. If you prefer airy texture, use bread flour.
- Hydration and feel: Learn to judge dough by touch rather than exact cup counts; humidity and flour brand change absorption.
- Crust control: Brush with butter after baking for a softer crust; use egg wash before baking for a shiny, deeper-colored crust.
- Even loaves: Rotate pans halfway through baking if your oven has hot spots.
- Always cool before slicing more than a quick piece — the interior continues finishing as it cools.
Creative Twists
- Herb & Garlic: Add 1–2 teaspoons dried herbs (rosemary, thyme) and 1–2 cloves minced garlic into the dough for a fragrant savory loaf.
- Raisin & Oat: Fold in 3/4 cup raisins and replace 1/2 cup flour with 1/2 cup rolled oats for a slightly sweet breakfast loaf.
- Seeded Top: Brush loaves with a little water or beaten egg and sprinkle sesame seeds, poppy seeds, or a mix of sunflower and flax seeds before baking.
- Cheese Swirl: Roll out the dough into a rectangle, scatter 1–1 1/2 cups shredded cheddar, roll up, and bake for a cheesy pull-apart-style loaf.
- Gluten-free note: For a gluten-free version, consult recipes built around gluten-free flour blends and binding agents (this recipe’s structure will need significant alteration for success).
Recipe Q&A
Q: Can I substitute sugar for the honey?
A: Yes — sugar works fine. Honey adds a gentle flavor and slightly more moisture; use 1/4 cup granulated sugar if you prefer.
Q: Why didn’t my dough rise?
A: Most commonly the yeast was too old or the water was too hot (killed the yeast) or too cold (didn’t activate). Ensure yeast foams during the proofing step. If no foam after 10 minutes, discard and restart with fresh yeast.
Q: My bread is dense. What went wrong?
A: Either not enough kneading to develop gluten, too much flour (dough too stiff), or the first rise was too short. Try kneading a few minutes longer and give the dough adequate warm time to double in size.
Q: Can I make this in a bread machine?
A: Yes, you can adapt this to a bread machine by adding ingredients in the order your machine manufacturer recommends and selecting a basic white loaf cycle.
Q: How can I keep slices softer longer?
A: Store in an airtight container at room temperature and brush or wrap with a thin layer of butter after slicing to help retain moisture. Freezing is best for longer storage.
Conclusion
Bring this recipe into your kitchen and you’ll quickly discover how small rituals — a warm bowl of proofed yeast, the gentle punch down, the first slice — become everyday pleasures. If you love seeing simple ingredients transform into something nourishing and shareable, you’ll enjoy comparing notes and techniques on other home-bread resources like EASY HOMEMADE BREAD RECIPE – Butter with a Side of Bread and the detailed approach at Homemade Bread Recipe – Tastes Better from Scratch. Please try the recipe, leave a comment with your favorite variation, and share photos — I’d love to see how your loaves turn out!
Printable Recipe Card
Want just the essential recipe details without scrolling through the article? Get our printable recipe card with just the ingredients and instructions.