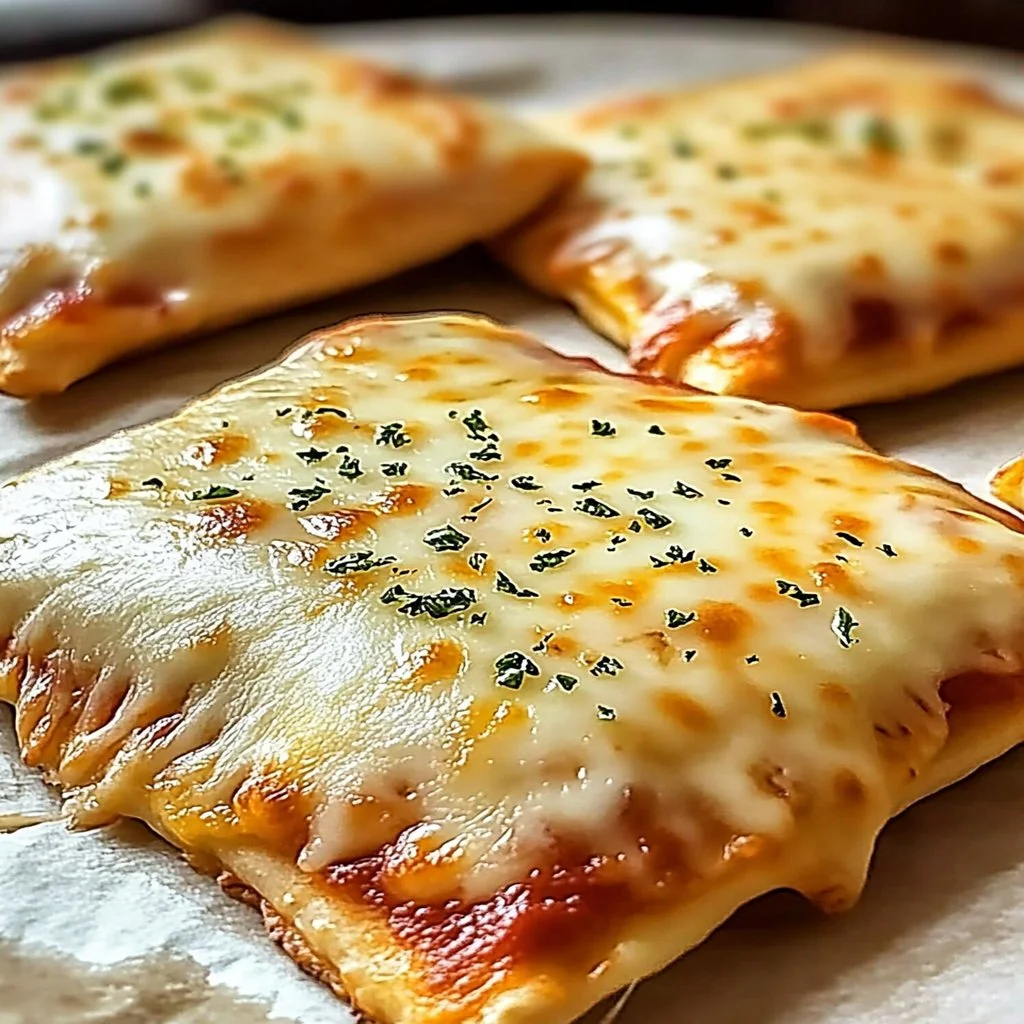
Homemade Easy Cheesy Pizza Pockets
Introduction
There’s something undeniably comforting about the smell of melted cheese and warm bread — that first inhale as golden pockets emerge from the oven, the way steam fogs the plate, and the satisfying, chewy bite that releases a river of molten mozzarella and tangy marinara. These homemade easy cheesy pizza pockets are exactly that: portable, nostalgic, and endlessly customizable. They’re perfect for cozy weekend breakfasts, quick weeknight dinners, kid-friendly lunchboxes, or a crowd-pleasing appetizer at casual gatherings. If you like a tried-and-true version you can adapt, check out the classic Homemade Easy Cheesy Pizza Pockets recipe for another take on this favorite — then use the steps below to make them your own.
Dish Snapshot
- Prep Time: 15 minutes (plus any dough rising time, if using homemade dough)
- Cook Time: 15–20 minutes
- Total Time: 30–40 minutes (depending on whether dough needs proofing)
- Servings: 4 (about 8 pockets; plan 2 pockets per person)
- Difficulty Level: Easy — great for beginner bakers and busy cooks
Nutrition Highlights
Nutrition per serving (2 pockets). These values are estimates calculated using standard USDA FoodData Central entries for pizza dough, shredded mozzarella, olive oil, and common topping ingredients; they are intended as a guide. For general dietary guidance, reputable sources include the CDC and Mayo Clinic.
- Calories: ~560 kcal
- Protein: ~25 g
- Carbohydrates: ~57 g
- Fat: ~26 g
- Fiber: ~3 g
- Sodium: ~820 mg
Notes: Actual nutrition will vary with the exact brands and topping choices (e.g., pepperoni vs. vegetables). The calorie estimate reflects 1 lb (454 g) pizza dough, 2 cups shredded mozzarella, 1 cup mixed toppings (partly pepperoni plus vegetables), and 2 tbsp olive oil, divided into 4 servings. These estimates were derived from USDA FoodData Central averages and rounded for clarity.
Perfect For…
- Easy weeknight dinners when you want comfort food without fuss.
- Parties and potlucks — they’re handheld, shareable, and loved by kids and adults alike.
- Make-ahead lunches or game-day snack platters.
- Creating family memories: assemble them together with kids for a hands-on cooking night.
Preparation Guide
Ingredients
- 1 lb pizza dough (store-bought or homemade)
- 2 cups (about 226 g) shredded mozzarella cheese
- 1 cup assorted toppings (e.g., pepperoni slices, diced bell peppers, sliced mushrooms)
- 2 tbsp olive oil
- 1 tsp Italian seasoning
Optional ingredients and substitutions:
- 1/2 cup marinara or pizza sauce (inside pockets for extra sauciness)
- For a leaner option, substitute turkey pepperoni or remove processed meats and use more veggies.
- To make vegan: use vegan mozzarella and olive oil or vegan butter; choose plant-based pepperoni or roasted veggies.
- For gluten-free: use a gluten-free pizza dough (store-bought or a mix) and adjust baking time as directed by the manufacturer.
Step-by-step Instructions
- Preheat your oven to 400°F (200°C) and line a baking sheet with parchment paper.
- On a lightly floured surface, roll out the pizza dough to about 1/8 inch (3 mm) thick. Trim if necessary and cut into squares roughly 4 × 4 inches. You should get about 8 squares from 1 lb dough (adjust if you prefer smaller or larger pockets).
- If using sauce, place about 1 teaspoon marinara on one half of each square (avoid over-saucing to prevent sogginess).
- Add a generous amount of shredded mozzarella and your chosen toppings on one half of each square (about 2–3 tablespoons of cheese).
- Fold the other half of the square over the filling, forming a rectangle or triangle. Press the edges firmly with the tines of a fork to seal. Make a small vent slit on top to allow steam to escape.
- Place the sealed pockets on the prepared baking sheet. Brush each pocket with olive oil and sprinkle with Italian seasoning for color and flavor. For a glossy finish, substitute an egg wash (1 beaten egg) if desired.
- Bake for 15–20 minutes, or until the crust is golden brown and the cheese inside is melted. Rotate the pan halfway through for even browning.
- Remove from oven and let the pockets rest 3–5 minutes before serving to avoid burns from hot cheese.
Practical tips: Don’t overfill — too much filling prevents proper sealing and increases the chance of leaks. If seams won’t stay sealed, chill pockets for 10–15 minutes before baking to firm the dough. Use a small vent to avoid pressure bursts and puddles of hot cheese.
Best Pairings
- Dipping sauces: warm marinara, garlic butter, or pesto aioli for contrasting flavors.
- Salads: crisp Caesar, arugula with lemon, or a simple mixed greens salad cuts richness.
- Drinks: pair with coffee or tea for a brunchy twist, or serve with soda/beer for a party spread.
- Sides: roasted vegetables, homemade fries, or a fresh tomato-cucumber salad complement the pockets for a fuller meal.
Keeping it Fresh
- Room temperature: best enjoyed within 2 hours after baking; do not leave pockets out longer than 2 hours for food safety reasons.
- Refrigerator: store cooled pockets in an airtight container for 3–4 days. Reheat in a 350°F (175°C) oven for 8–10 minutes to restore crispness.
- Freezer: place cooled, individually wrapped pockets in a single layer on a baking sheet to flash-freeze, then transfer to a freezer-safe bag or container for up to 2 months. Reheat from frozen at 375°F (190°C) for 18–22 minutes (or until heated through).
Pro Tips & Tricks
- Use part-skim mozzarella for less grease and a clean, melty pull; full-fat gives richer flavor.
- Par-bake the dough squares 2–3 minutes before filling if using very wet toppings or sauce-heavy fillings — this helps prevent soggy bottoms.
- Keep fillings chopped uniformly so pockets bake evenly. Thin pepperoni or pre-sautéed mushrooms release less moisture.
- Seal edges with a little beaten egg or a thin slurry of flour and water to help stubborn seams hold.
- For the crispiest crust after refrigerating, reheat in a hot oven or toaster oven rather than microwave.
Switch It Up!
- Vegetarian Supreme: Replace pepperoni with roasted bell peppers, caramelized onions, spinach, and black olives; add a sprinkle of feta for tang.
- Vegan Pocket: Use your favorite vegan mozzarella and dairy-free butter for the egg-wash substitute; fill with roasted veggies and marinara.
- Breakfast Pizza Pocket: Fill with scrambled eggs, crumbled breakfast sausage or bacon, cheddar cheese, and chopped scallions — serve warm with hot coffee.
- Gluten-Free Option: Use a certified gluten-free pizza dough or flatbread; watch baking time as crusts may brown faster.
Common Questions & Answers
Q: Can I make these ahead and bake later?
A: Yes — assemble pockets, place them on a tray, cover, and refrigerate for up to 24 hours before baking. For longer storage, freeze assembled pockets (flash-freeze first) and bake from frozen, adding 5–8 minutes to baking time.
Q: How do I avoid soggy pockets?
A: Use less sauce, pre-cook watery vegetables (like mushrooms), and either par-bake the dough slightly or chill assembled pockets before baking.
Q: Can I freeze baked pockets?
A: Absolutely. Freeze baked and cooled pockets in an airtight container for up to 2 months. Reheat wrapped in foil at 350°F (175°C) until warmed through.
Q: What’s a good cheese ratio?
A: About 2–3 tablespoons of shredded cheese per pocket gives a melty center without overpowering the dough. Adjust to taste.
Q: Are there healthier swaps?
A: Yes — choose whole wheat or cauliflower dough for more fiber, part-skim cheese, and load up on vegetables instead of processed meats.
For an alternate version with slightly different assembly and seasoning options, see this other variation: Homemade Easy Cheesy Pizza Pockets.
Conclusion
These homemade easy cheesy pizza pockets are an approachable, crowd-pleasing recipe you’ll return to again and again — simple enough for weeknights, flexible enough for creativity, and cozy enough for shared meals. Try the basic method, then make it yours with different cheeses, fillings, and sauces. If you make a batch, share a photo or note with the community so others can try your favorite twist — happy baking!
Printable Recipe Card
Want just the essential recipe details without scrolling through the article? Get our printable recipe card with just the ingredients and instructions.