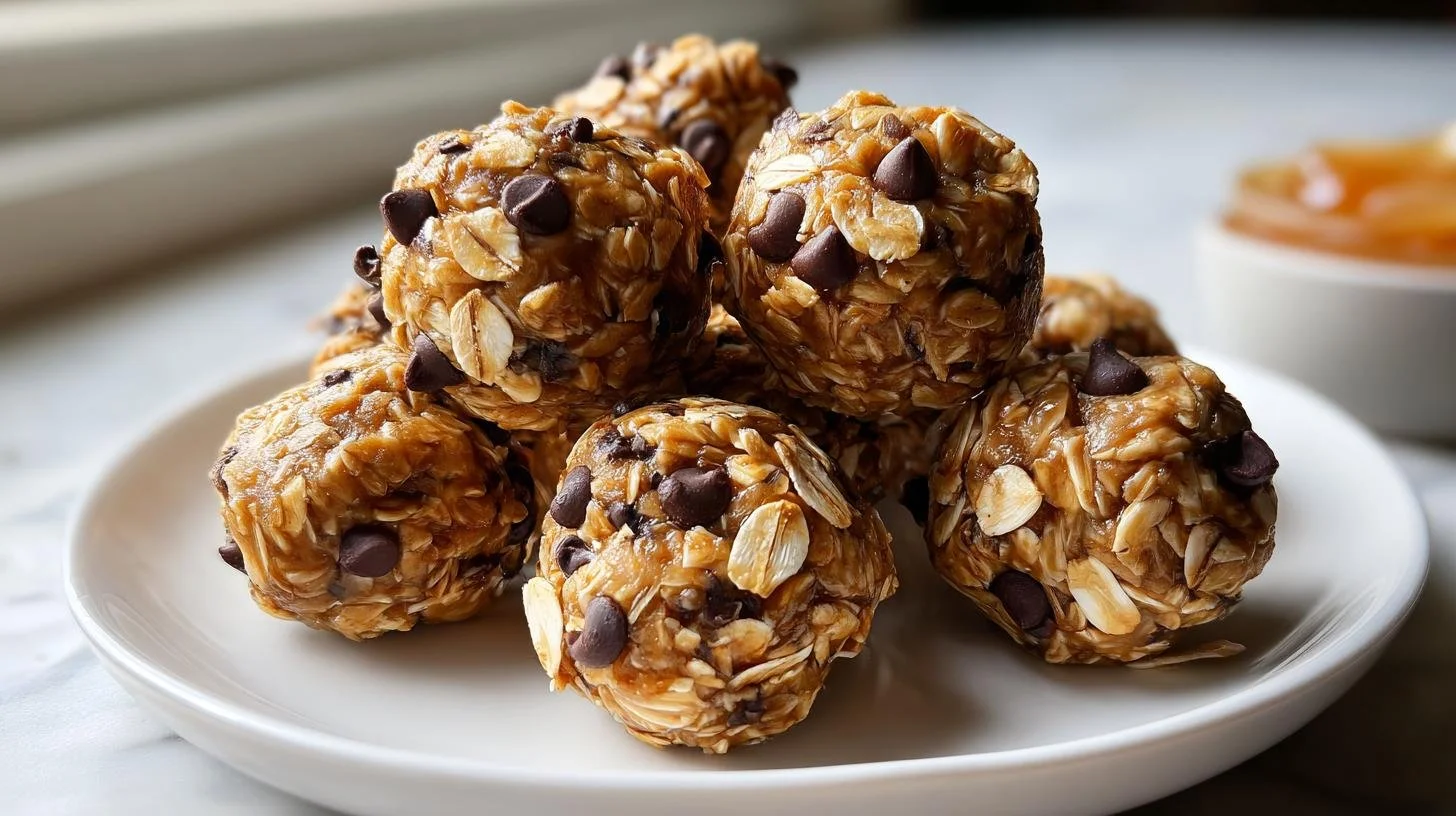
Luscious No-Bake Protein Balls – 5-Minute Power Snacks
Introduction
Close your eyes and imagine a warm whiff of roasted peanuts mingling with the sweet, floral lift of honey—then a tiny, satisfying snap of mini chocolate chips followed by a tender, chewy oat center. These Luscious No-Bake Protein Balls deliver on aroma, taste, and texture: soft but slightly springy, sweet with a hint of salt, and perfectly bite-sized for an instant energy boost. They feel like a hug in a handful—comforting, uncomplicated, and slightly indulgent in the best way.
They’re perfect for busy mornings when you need something you can eat on the go, for an office snack drawer that needs rescuing, for after-workout refueling, or as an easy, crowd-pleasing addition to a brunch or picnic. If you enjoy peanut-butter-forward treats, you might also like this variation on similar energy bites: no-bake chocolate peanut butter balls—a close cousin with a richer chocolate profile.
Dish Snapshot
- Prep Time: 5 minutes
- Cook Time: 0 minutes (no baking required)
- Total Time: 25 minutes (including chilling)
- Servings: Makes about 12 bite-size balls (approx. 1 tablespoon each)
- Difficulty Level: Very Easy — beginner-friendly
Nutrition Highlights
Estimated nutrition per serving (one ball), based on standard ingredient measures and USDA FoodData Central entries for peanut butter, honey, rolled oats, and chocolate chips. These are estimates intended for guidance; for personalized dietary advice consult your healthcare provider or resources like the CDC or Mayo Clinic.
- Calories: ~130 kcal
- Protein: ~4.1 g
- Carbohydrates: ~15.0 g
- Fat: ~6.8 g
- Dietary Fiber: ~1.6 g
- Sugars: ~8 g
Notes: Estimates were calculated from ingredient-level data (USDA FoodData Central). The snack supplies a modest amount of protein and healthy fats from the peanut butter alongside quick carbohydrates from honey and oats—making it suitable for a pre- or post-activity nibble.
Why You’ll Love It
- Speed and simplicity: Whisking these together takes five minutes; chilling makes the only passive step.
- Flavor balance: The natural saltiness of peanut butter heightens the sweetness of honey and chocolate, creating a satisfyingly balanced bite.
- Versatile energy: They’re portable, non-perishable for short periods, and provide a mix of carbs and fats to fuel short bursts of activity.
- Crowd-pleasing nostalgia: They echo classic childhood favorites but feel grown-up—great for packed lunches, potlucks, or as a fitness-friendly sweet.
- Health-forward swaps: With simple ingredient tweaks you can make them vegan, gluten-free, or higher in protein.
How to Make Luscious No-Bake Protein Balls – 5-Minute Power Snacks
Ingredients
- 1/2 cup (8 tbsp / ~128 g) creamy peanut butter
- 1/4 cup (4 tbsp / ~84 g) honey
- 1 cup (about 90 g) rolled oats (old-fashioned)
- 1/4 cup (about 43 g) mini chocolate chips
Optional ingredients and substitutions
- For vegan: swap honey for maple syrup or agave nectar and use a nut butter of choice.
- For nut-free: use sunflower seed butter instead of peanut butter.
- To boost protein: add 2 tbsp of unflavored or vanilla whey or plant protein powder (reduce oats by 2 tbsp if mixture feels dry).
- For extra texture: fold in 2 tbsp chopped toasted nuts, 1 tbsp chia seeds, or 1 tbsp flaxseed meal.
Step-by-step instructions
- In a medium bowl, stir together the peanut butter and honey until smooth and fully combined.
- Mix in the rolled oats until the mixture is evenly combined and slightly tacky. If using protein powder or other dry add-ins, mix them in now.
- Fold in the mini chocolate chips gently so they’re distributed but don’t melt from overworking.
- Scoop about 1 tablespoon of mixture per ball and roll between your palms into bite-sized spheres. If the mixture sticks too much, lightly oil damp hands or chill mixture for 5–10 minutes and try again.
- Place rolled balls on a plate or sheet lined with parchment and chill in the refrigerator for at least 20 minutes or until firm.
Practical tips
- Don’t overmix: overworking can make the texture gummy—stir until just combined.
- Adjust texture with oats: add up to 2 tablespoons more oats for firmer balls, or a teaspoon of water/honey for softer ones.
- Chill time: while 20 minutes is minimum, chilling longer firms the exterior for neater presentation.
- Test one first: roll one ball and chill it to check firmness before rolling the whole batch.
Serving Suggestions
- As-is: Serve a handful on a small plate for an afternoon pick-me-up.
- With coffee or tea: Their sweetness pairs beautifully with a bold coffee or robust black tea.
- On a snack board: Arrange alongside fresh fruit, Greek yogurt, and nuts for a balanced grazing plate.
- Dessert bites: Drizzle melted dark chocolate over a few chilled balls and sprinkle sea salt for a fancy after-dinner treat.
- Lunchbox upgrade: Pack 2–3 with carrot sticks and a small container of hummus for a balanced school or work lunch.
For another coconut-forward, no-bake take that’s lovely with tea, check this variation: no-bake coconut cream balls.
How to Store
- Room temperature: Up to 1–2 days in an airtight container (only if kept in a cool, dry place).
- Refrigeration: Store in an airtight container for up to 7–10 days—this is the recommended method for best texture and safety.
- Freezer: Freeze in a single layer on a tray until firm, then transfer to a freezer bag or container for up to 3 months. Thaw in the fridge or at room temperature for 10–15 minutes before eating.
Pro Tips & Tricks
- Peanut butter choice: Natural peanut butter (oil-separated) gives a purer peanut flavor but may need a little stirring; choose creamy for easier mixing. For reduced sodium, choose a low-salt peanut butter.
- Oats texture: Old-fashioned rolled oats keep a pleasant chew; quick oats will yield a softer, denser result.
- Rolling technique: Use lightly damp or lightly oiled hands to prevent sticking—wipe hands between batches.
- Chocolate chips: Mini chips distribute more evenly and reduce melting; if you want chocolate ribbons, fold in finely chopped dark chocolate just before chilling.
- Flavor depth: A pinch of flaky sea salt on top of each chilled ball brightens flavors and enhances the chocolate-peanut contrast.
Creative Twists
- Chocolate-protein boost: Add 2 tbsp cocoa powder and 2 tbsp chocolate protein powder; reduce oats by 1–2 tbsp to keep the right consistency.
- Tropical coconut: Swap mini chocolate chips for 1/4 cup shredded unsweetened coconut and 2 tbsp chopped dried pineapple; use almond butter for a lighter nut profile.
- Nut-free energy: Use sunflower seed butter + 2 tbsp cocoa nibs + 1 tbsp chia seeds for crunch.
- Lemon-chocolate twist: Stir in 1 tsp lemon zest and replace chips with white chocolate chips (or use lemon-flavored chips) for a bright variation.
Frequently Asked Questions
Q: Can I make these gluten-free?
A: Yes—use certified gluten-free rolled oats to ensure they’re safe for those with celiac or gluten sensitivity.
Q: They’re too sticky—how do I fix the texture?
A: Chill the mixture for 5–10 minutes, then roll. You can also add 1–2 tablespoons more oats or a tablespoon of protein powder to firm the mix.
Q: How long will they last in the freezer?
A: Up to 3 months if stored airtight; thaw in the fridge or at room temperature briefly before serving.
Q: Want them less sweet or lower in sugar?
A: Reduce the honey to 2 tbsp and add a mashed banana or unsweetened applesauce for moisture (this will change texture slightly).
Conclusion
These Luscious No-Bake Protein Balls are a dependable, fast, and crowd-pleasing snack that bridges convenience and comfort—perfect for active days, last-minute guests, or a simple self-care ritual. If you’re inspired to experiment, you’ll find lovely flavor riffs like the Raw Cacao Vanilla Energy Bites and a zesty option in the No Bake Chocolate Lemon Energy Bites & Truffles – EA Stewart—both great for riffing on this base. Try the recipe, share how you customized it, and join the conversation: your tweaks might be the next crowd favorite.
Printable Recipe Card
Want just the essential recipe details without scrolling through the article? Get our printable recipe card with just the ingredients and instructions.