
Old Fashioned Yeast Rolls
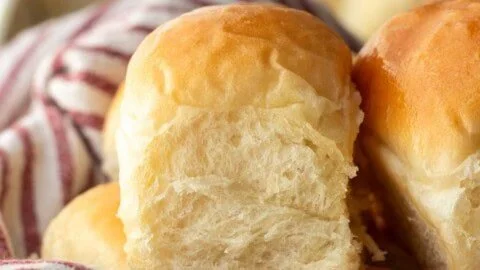
There’s nothing quite like the warm, buttery pull of a freshly baked yeast roll—the smell of melting butter and honey drifting through the kitchen, the soft, pillowy crumb that yields under your fingers, and the golden, slightly crisp tops that beckon you to break one open and slather it with more butter. These Old Fashioned Yeast Rolls taste like comfort and tradition in every bite: slightly sweet, tender, and endlessly comforting.
These rolls are perfect for cozy weekend breakfasts with coffee, family holiday dinners where everyone reaches for “just one more,” or as a make-ahead bread for a casual weeknight supper. If you love vintage bakes and the slow, satisfying process of yeast bread, you might also enjoy my old-fashioned orange cake, which shares that same nostalgic charm.
At a Glance
- Prep Time: 20–30 minutes active (plus kneading and shaping)
- Cook Time: 15–16 minutes
- Rise Time: 2 hours total (two rises: ~1 hour each)
- Total Time: About 2 hours 30 minutes (including rises)
- Servings: 30 rolls
- Difficulty Level: Intermediate (basic yeast handling and shaping)
Nutrition Highlights
Nutritional estimates are approximate and were calculated using USDA FoodData Central values for each ingredient. Values below are per roll (1 of 30) and include the butter brushed on top.
- Calories: ~174 kcal
- Protein: ~4 g
- Carbohydrates: ~28 g
- Fat: ~4.6 g
- Sodium: ~190–220 mg (varies with brand of salted butter and precise salt measure)
- Fiber: ~1 g
Notes:
- These rolls are enriched (with butter and eggs) and rely on white flour and honey for sweetness—expect a carbohydrate-forward profile. For general dietary guidance related to sodium or carbohydrate intake, reputable sources such as the USDA and Mayo Clinic are helpful references.
- If you need stricter nutrient tracking for medical reasons, weigh your final piece and use USDA FoodData Central or a registered dietitian for precise calculations.
Why You’ll Love It
- Aroma & Taste: The combination of honey and butter gives a gentle sweetness that complements both savory and sweet accompaniments. The warm, yeasty aroma evokes cozy kitchens and family gatherings.
- Memories & Tradition: This style of roll is a classic—great for holiday tables and regular weeknight dinners alike. They’re the kind of recipe handed down, improved, and loved.
- Make-Ahead Friendly: Dough can be refrigerated after the first rise for a slow, overnight development if your schedule requires flexibility.
- Versatile: Serve them plain, buttered, or use for sliders—these rolls adapt to both festive and everyday meals.
How to Make Old Fashioned Yeast Rolls
Ingredients (exact quantities):
- 2 cups warm water (100–110°F / 475 mL)
- 1/4 cup honey (85 g)
- 4 teaspoons active dry yeast (14 g)
- 1/2 cup salted butter, softened (113 g)
- 2 large eggs
- 2 1/2 teaspoons salt
- 7 cups all-purpose flour (about 1000 g)
- 3–4 tablespoons melted butter (for brushing tops after baking)
Optional ingredients and substitutions:
- Use 1/2 cup (113 g) unsalted butter and increase salt to taste (adds control over sodium).
- Replace honey with 1/4 cup granulated sugar if preferred.
- For richer flavor, substitute up to 1/2 cup of the water with warm milk.
- For a dairy-free/vegan option: use plant-based butter and replace eggs with 2 flax “eggs” (2 tbsp ground flaxseed + 6 tbsp water, chilled) — texture will be slightly different.
- To make whole-wheat rolls: replace up to 2 cups (about 280 g) of the flour with whole-wheat flour; you may need a little extra water.
Step-by-step instructions:
- In a small bowl, stir together warm water (100–110°F), honey, and active dry yeast. Water temperature is important—too hot will kill the yeast, too cool slows activation. Let rest 5 minutes until the yeast becomes foamy on top.
- In a large mixing bowl (or the bowl of a stand mixer), combine softened butter, eggs, salt. If using a scale, set the bowl on it, zero it, and add flour to reach 1000 g for accuracy.
- Pour the foamy yeast mixture into the bowl with the butter, eggs, salt, and flour.
- Knead the dough until elastic and smooth: 7–10 minutes by hand, or 5–7 minutes in an electric mixer with a dough hook. The dough should be tacky but pull away from the bowl.
- Transfer dough to an oiled bowl, cover with plastic wrap or a dish towel, and let rise for about 1 hour, or until almost doubled in size.
- Punch down gently and divide the dough into 30 even pieces (golf ball-sized), roughly 58–60 g each. You can weigh the entire dough and divide by 30 to be precise.
- Roll each piece into a smooth ball by cupping your hand in a "C" shape and moving the dough in small circles on a work surface. This tucks the seams under and creates a smooth top.
- Place rolls in a greased 11 x 18-inch rimmed baking pan (about 6 rows of 5). Spray lightly with baking spray to prevent drying, cover, and let rise for about 1 hour until doubled and gaps are filled. If your kitchen is cool, they may need a little longer.
- Preheat oven to 375°F (190°C) at the 45–50 minute mark of the second rise.
- Bake the rolls at 375°F for 15–16 minutes on the middle or lower rack to encourage a nicely browned bottom.
- Remove rolls from oven, immediately brush the tops with 3–4 tablespoons melted butter (or rub a butter stick across warm tops). Serve warm.
Practical tips:
- Avoid over-flouring: dough should be soft and slightly tacky. Add flour sparingly while kneading.
- Test doneness: rolls are done when tops are golden and the internal temperature reads ~190–200°F, or when bottoms sound hollow when tapped.
- If yeast doesn’t foam after the initial 5–10 minutes, your yeast may be old or the water temperature wrong—start over with fresh yeast.
Best Pairings
- Classic: Serve warm with salted butter, honey butter, or softened herb butter.
- Breakfast: Split and fill with ham, egg, and cheese for sliders; pair with coffee or tea.
- Dinner: Perfect beside soups, stews, roasted meats, or a holiday turkey.
- Sweet twist: Split and spread with jam or lemon curd for an afternoon treat.
- For a different old-fashioned breakfast result, try pairing these rolls with a fried treat like my old-fashioned sour cream donuts for a nostalgic brunch spread.
Storing Leftovers
- Room temperature: Keep in an airtight container or tightly wrapped at room temperature for up to 2 days—they stay soft best when stored this way.
- Refrigerator: Store in an airtight container for up to 4–5 days. Refrigeration may slightly dry enriched doughs; reheat by warming briefly in the oven or microwave with a damp paper towel.
- Freezer: Wrap rolls individually or in a block wrapped tightly in plastic wrap and foil; freeze for up to 3 months. To use, thaw in the fridge overnight and reheat in a 300°F oven until warmed through.
Pro Tips & Tricks
- Measure flour by weight for consistent results—7 cups can vary widely by how you scoop.
- Water temperature matters: use an instant-read thermometer to ensure 100–110°F for best yeast activation.
- For a shinier top, brush with an egg wash (1 beaten egg + 1 tsp water) before baking—note this will alter texture and color.
- If your kitchen is cold, create a warm rise environment by preheating the oven to 200°F for 2–3 minutes, turning it off, placing the covered dough inside, and closing the door.
- For deeper flavor, let the shaped rolls rise covered in the refrigerator overnight (slow cold fermentation), then bake the next day—this enhances aroma and chewiness.
Creative Twists
- Herb & Garlic Dinner Rolls:
- Fold 2 tbsp finely chopped fresh herbs (rosemary, thyme, or parsley) into the dough and brush tops with garlic butter after baking.
- Honey-Butter Cinnamon Rolls:
- Roll out the dough slightly, spread melted butter, sprinkle a cinnamon–sugar mixture, roll, slice into rounds, and bake for sweet cinnamon rolls.
- Whole-Grain Variation:
- Replace 1–2 cups of all-purpose flour with whole-wheat pastry flour and add 1–2 tbsp extra water. Expect a nuttier flavor and slightly denser crumb.
- Vegan Version:
- Use plant-based butter, replace eggs with flax eggs (2 tbsp ground flax + 6 tbsp water), and use a vegan milk substitute for part of the water to enrich crumb.
All Your Questions Answered
Q: Can I halve the recipe?
A: Yes. Halve all ingredient amounts and shape 15 rolls. Adjust baking time only if using a smaller pan; monitor for golden tops and hollow sound.
Q: My rolls are dense—what went wrong?
A: Common causes: under-kneading, too much flour, not enough rise time, or dead yeast. Ensure dough is elastic, rises until nearly doubled, and yeast is fresh.
Q: Can I freeze the dough before baking?
A: Yes. After the first rise and shaping into balls, freeze the unbaked rolls on a tray until solid, then transfer to a freezer bag. Thaw overnight in the fridge, let rise, then bake.
Q: How do I make them less sweet?
A: Reduce honey to 2 tbsp or substitute with an equal amount of sugar and taste the dough. Small reductions won’t harm yeast activity.
Conclusion
These Old Fashioned Yeast Rolls are an instant classic—simple ingredients, a comforting aroma, and a crowd-pleasing result that fits holidays, family dinners, and slow weekend mornings alike. Try the recipe, adapt a variation that suits your table, and share photos or tips with fellow bakers to keep the tradition alive.
For a modern take and a community-tested version, compare this recipe with Grandma’s Old-Fashioned Yeast Rolls Recipe – Allrecipes, and for historical notes and a century-old perspective, read Old Fashioned Yeast Rolls (a 100 year old recipe!) – Feast and Farm.
Happy baking—there’s nothing like the first warm roll out of the pan.
Printable Recipe Card
Want just the essential recipe details without scrolling through the article? Get our printable recipe card with just the ingredients and instructions.


