Quick 20-Minute Homemade Bread
Introduction
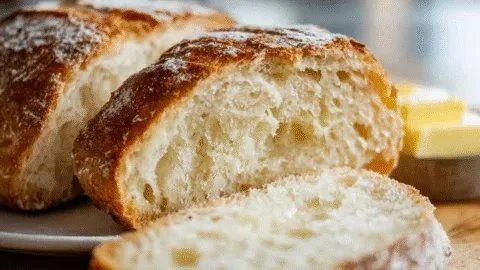
There’s something irresistible about warm bread straight from the oven: the first inhalation of that toasty, slightly sweet aroma, the crackle of a golden crust under your fingers, the tender, pillowy crumb that yields to a pat of melting butter. This quick 20-minute homemade bread captures all of that: fast, comforting, and honest. It’s the smell that gets everyone into the kitchen, the simple taste that calms a busy day, and the texture that turns a slice into an experience.
Make this loaf on a hectic morning for a cozy breakfast, pull it together for a last-minute gathering, or bake it as a companion to soups and salads on a chilly evening. If you’re curious about other simple loaves and want ideas for shaping or serving, my broader tips are a great place to start — check this simple homemade bread guide for further inspiration: hands-on homemade bread tips.
At a Glance
- Prep Time: 5 minutes active + 5 minutes resting
- Cook Time: 15 minutes
- Total Time: 20–25 minutes (including oven preheat)
- Servings: about 8 slices
- Difficulty Level: Easy — perfect for beginners and busy cooks
Nutrition Information
Nutrition per serving (1 slice, recipe divided into 8 servings). Estimates are calculated using standard entries for all-purpose flour, granulated sugar, instant yeast, and olive oil from USDA FoodData Central and aligned with general guidance from the Mayo Clinic for portion context.
- Calories: ~151 kcal
- Protein: ~3.5 g
- Carbohydrates: ~24.4 g
- Sugars: ~1.6 g
- Fiber: ~0.8 g
- Fat: ~3.8 g
- Saturated fat: ~0.4 g
- Sodium: ~290 mg
- Cholesterol: 0 mg
Notes: These are estimates intended for guidance. For precise tracking, weigh ingredients and consult USDA FoodData Central or a registered dietitian, especially if you have dietary restrictions or medical considerations.
Why You’ll Love It
This loaf nails the balance between speed and comfort. It’s all about the aroma-first appeal and the social pull: that warm, buttery scent invites conversation and slows everyone down for a shared moment. It’s perfect for:
- Cozy breakfasts with jam or honey
- Quick sides for weeknight soups
- Last-minute company when you want something homemade without the fuss
- Holidays when extra oven time is tight and you still want fresh bread
How to Make Quick 20-Minute Homemade Bread
Ingredients
- 2 cups (about 240 g) all-purpose flour
- 1 tablespoon granulated sugar
- 1 tablespoon instant yeast
- 1 teaspoon fine salt
- 3/4 cup (180 mL) warm water (about 110°F / 43°C)
- 2 tablespoons olive oil or melted butter
Optional ingredients and substitutions:
- Swap 2 tbsp olive oil for melted butter for a richer flavor.
- For slight whole-grain texture, replace up to 1/2 cup of flour with whole-wheat flour (may slightly reduce rise).
- Add 1–2 teaspoons dried herbs (rosemary, thyme) or 1 tablespoon sesame seeds on top.
- Make it vegan by using olive oil or any neutral oil (already vegan).
Method (step-by-step)
- Warm the water to about 110°F (just comfortably warm to the touch). In a mixing bowl, combine warm water, sugar, and instant yeast. Stir gently and let sit 5 minutes until foamy — a sign the yeast is active.
- Add the flour, salt, and olive oil (or melted butter) to the bowl. Stir with a wooden spoon or spatula until a soft, slightly sticky dough forms. Avoid overworking — this is not a bread dough that needs long kneading.
- Turn the dough onto a lightly floured surface and shape it briefly into a smooth loaf (a few folds and a gentle roll is enough). Place it on a parchment-lined baking sheet, seam side down.
- Let the shaped dough rest for 5 minutes while you preheat the oven to 400°F (200°C). The brief rest allows the dough to relax and the oven to reach temperature.
- Optional: Brush the top lightly with olive oil or melted butter and sprinkle seeds or coarse salt if desired.
- Bake for 15 minutes until the crust is golden brown and the loaf sounds hollow when tapped on the bottom. For extra confidence, an internal temperature of about 190–200°F (88–93°C) indicates doneness.
- Remove from oven and cool on a rack for 5–10 minutes before slicing. This short cooling time helps the crumb set while keeping the loaf warm and inviting.
Practical tips
- Avoid overmixing: the dough should be soft and a little sticky; overworking will make the loaf tough.
- Check doneness visually (golden color) and by tapping for a hollow sound.
- If your oven runs cool, add 1–2 minutes; if it runs hot, reduce by a minute.
Best Pairings
- Spread with butter, honey, or your favorite jam for breakfast.
- Serve alongside a bowl of tomato soup or a hearty stew for dinner.
- Make open-face sandwiches with avocado and smoked salmon for a quick lunch.
- Toast slices and top with ricotta and lemon zest for a bright appetizer.
- Pair with tea or coffee for a simple snack.
Ways to enjoy and presentation tips
- For a rustic look, dust lightly with flour before baking.
- Slice with a serrated knife for clean cuts; serve on a wooden board with small bowls of olive oil or flavored butter.
Storing Leftovers
- Room temperature: Keep in an airtight container or plastic bag for 1–2 days; best eaten the same day for peak texture.
- Refrigeration: Not recommended — refrigeration speeds staling. If you refrigerate, consume within 2–3 days.
- Freezer: Wrap tightly in plastic wrap and store in a freezer bag for up to 1–2 months. Thaw at room temperature and re-crisp in a 350°F (175°C) oven for 5–7 minutes.
Pro Tips & Tricks
- Use instant yeast (as written) to skip the lengthy proofing; if using active dry yeast, proof in warm water for 8–10 minutes first.
- For a crisper crust, place a small oven-safe pan with hot water on the bottom rack during the first 5 minutes of baking to create steam.
- If your dough feels too dry, add water 1 teaspoon at a time; too wet, dust with a bit more flour.
- For uniform slices, chill the loaf 10–15 minutes before slicing.
Creative Twists
- Herbed Olive Loaf: Add 1 tablespoon chopped fresh rosemary and 1 teaspoon lemon zest into the dough; top with flaky sea salt.
- Cheesy Garlic Twist: Fold in 1/2 cup grated Parmesan or cheddar into the dough and brush with garlic butter before baking.
- Sweet Cinnamon Swirl: Replace olive oil with melted butter, sprinkle a cinnamon-sugar mixture (1 tablespoon sugar + 1 tsp cinnamon) in the center when shaping, then roll and bake for a sweet breakfast loaf.
- Gluten-reduced option: For a lighter wheat content, use a cup of all-purpose and 1 cup of gluten-free flour blend designed for baking—results will vary, so expect a different texture.
Frequently Asked Questions
Q: Can I make this without sugar?
A: Yes. The small amount of sugar feeds the yeast for a quicker rise; you can omit it but expect a slightly less vigorous foam and a milder crust color.
Q: Why is my bread dense?
A: Common causes are overpacking flour, insufficient yeast activity (check expiration), using water that’s too hot (kills yeast) or too cold (slows yeast), or overmixing. Ensure proper water temperature (~110°F) and active yeast foam.
Q: Can I double the recipe?
A: Yes—double ingredients and shape into two loaves or one large loaf. Baking time may increase by a few minutes for larger shapes; watch color and internal temperature.
Q: Is this recipe vegan?
A: Yes, when using olive oil and no butter. The standard ingredient list is vegan-friendly if butter is not used.
Q: How do I revive stale slices?
A: Refresh in a 350°F oven for 5–8 minutes or toast slices; spreading with butter before reheating helps restore softness.
Conclusion
This quick 20-minute homemade bread is a little miracle for busy days—simple to make, comforting to eat, and endlessly adaptable. Try a plain slice with your morning coffee, or dress it up with herbs and cheese for company. If you’d like a slightly different flatbread approach, see a complementary take on quick flatbreads at homemade naan techniques.
For additional quick-bread ideas and alternative techniques that inspired this speedy loaf, see these helpful resources: Easy 20-Minute Homemade Bread Dough – Life with Janet and Fast Bread Recipe (Only 60 minutes) – Sugar Geek Show.
I’d love to hear how your loaf turns out — leave a comment, share a photo, or join our community of home bakers. Happy baking!